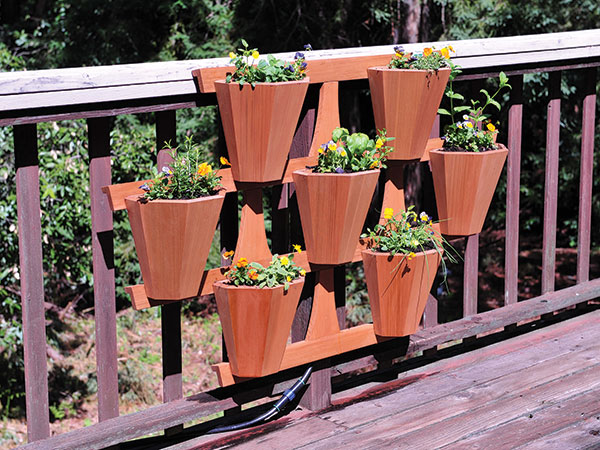
You don’t have to be a gourmet chef to know what tastes good. If you’ve used nothing but dry store-bought herbs to spice up your cooking, you’ll be astonished at how much better foods taste when seasoned with fresh, garden-grown herbs. But if you have a “brown thumb” like me, you’re probably reluctant to plant a garden, lest you forget to water for a few days and find your formerly lush plants shriveled and dying.
My solution was to design a hanging herb garden comprised of seven half octagon-shaped wooden planter boxes attached to a framework that can be hung from a deck railing, fence or even the sunny wall of a house or outbuilding (anywhere that gets six to eight hours of sunlight a day). The boxes are large enough to accommodate most kinds of common herbs (thyme, sage, basil, etc.) as well as other small plants or flowers; they’re not really large enough for big, shrubby plants. To prevent accidental “herbicide” (pun intended), I fitted a drip irrigation system complete with a programmable timer that waters the plants automatically — no more dead plants due to forgetfulness!
Getting Started
I fitted my hanging garden with seven planter boxes, but it’s basically a modular design: You may choose to have more or fewer as per your available space and planting needs. You could also scale up the size of the boxes and framework, to accommodate larger plants or even vegetables. I built my project entirely from kiln-dried Western cedar, but you may substitute any wood you choose; preferably one that weathers well outdoors (redwood, white oak, black locust, cypress, ipe, etc.).
Building Jigs
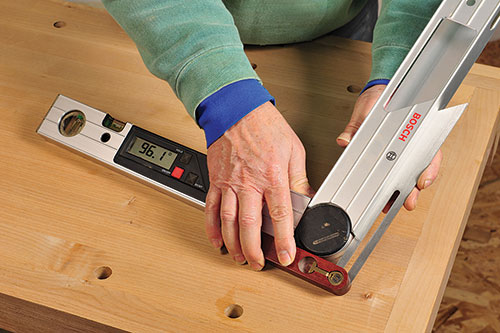
Once I determined the overall dimensions of my seven half-octagon-shaped hanging planters, I used a free online compound angle calculator to determine table saw settings needed to cut the planter’s tapered, beveled staves. Using the “N-Sided Box” option, I plugged in the desired number of sides (8) and the planter’s side angle, or degree of taper (15˚), and the calculator showed the necessary blade tilt angle (21.7˚) and miter angle (6.1˚).
To cut the staves, I built three dedicated jigs. One jig is used to cut the beveled miter on one edge of a stave, and a second is used to miter/bevel the other edge. The third jig is used to split staves perfectly in half (these are used at the back edge of the planter). (Note that all my jigs and cutting processes are meant to be used on table saws with left-tilting blades; for right-tilt saws, you must reverse the slant of the fences on the jigs and cut the staves with the rip fence set to the left of the blade.)
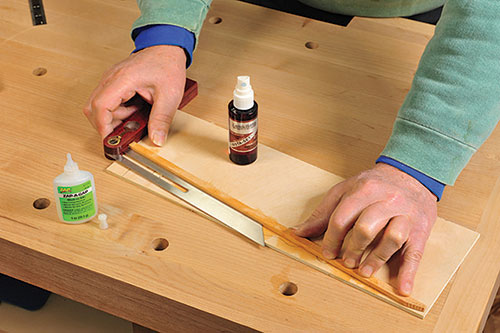
To make the jigs, I first cut three pieces of 1/4″ ply into 15″ x 6-1/2″ rectangles, making sure that all sides were square to one another. To make the jig used for the first taper cut on each stave, I set a bevel gauge to 96.1˚ (the stave miter angle plus 90˚). I use the bevel gauge to align a 1/4″ x 1/2″ x 12″ straight wood strip lengthwise on one of the plywood pieces; this acts like a fence to align the stave blank during cutting. Cyanoacrylate (CA) glue on the back of the strip holds it in place. I then glued on a short stop strip, set square to the long strip and positioned about 2″ up from the bottom end of the jig.
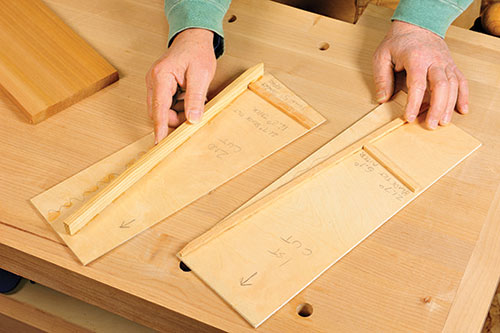
The jig used for the second cut on the staves is made just like the first, only the fence on this one is a 1/4″ x 7/8″ x 12″ wood strip set up on edge (this taller fence is necessary because it must align the edge of the blank that’s been mitered using the first jig). I aligned this strip with my bevel gauge set to 111.7˚ and angled the strip in the opposite direction as the first jig’s fence. This jig also has a short stop strip glued on at a 96.1˚ angle, relative to the fence strip.
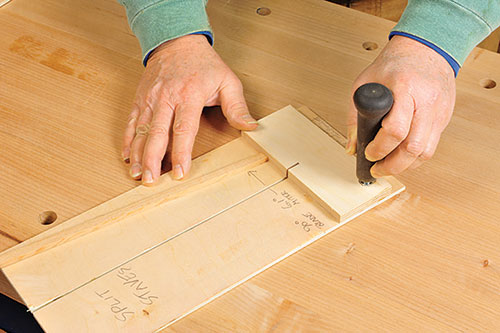
Then the third jig, used for cutting staves in half, has a 1/4″ x 1/2″ x 12″ straight fence strip glued on, aligned with the bevel gauge set to 96.1˚ and angled just as on the first jig. A 2-3/4″ x 6-1/2″ piece of 1/2″ plywood glued to the 1/4″ plywood, located as shown in the photo, reinforces the jig. With a nod to safety, I used a handle attached to the lower left corner of the 1/2″ plywood to make this jig safer and easier to use.
Cutting the Staves
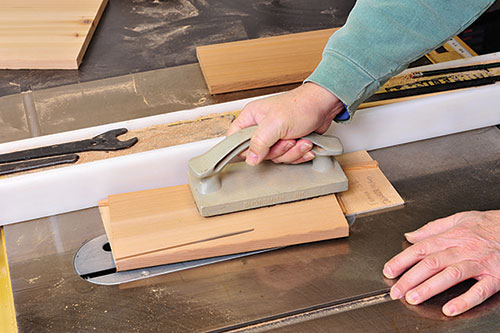
With the blade still tilted to 21.7˚, set the saw’s rip fence so that the blade just cuts into the edge of the second stave jig. Set one of the stave blanks into the jig, with the previously cut edge against the jig’s fence and wider end against the end stop. Take a cut and then measure the top surface of the wider end of the stave. Reposition the fence, cut, and re-measure the stave. Repeat this until the stave’s wide end is exactly 5″ wide. Now cut the second edge of all the stave blanks.
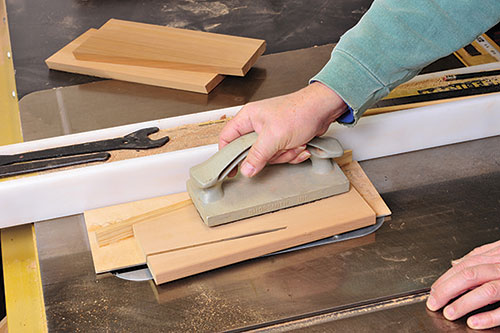
Select seven staves to cut into half staves. Using the third jig, position a stave with its wider outside face placed down in the jig and its edge and end set against the fence and end stop. Secure the stave by taping the stave to the fence strip.
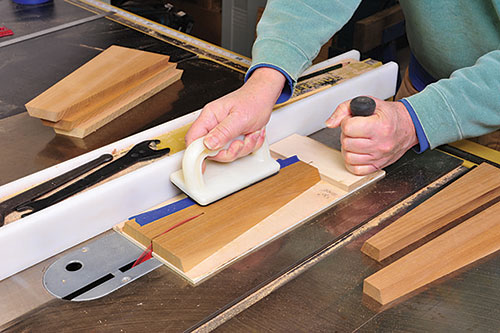
Mount a thin-kerf saw blade in the table saw. Set the blade square and position the rip fence so that the blade is exactly centered on the stave. Carefully cut all seven staves in half in this fashion.
Backs; Planter Glue-up
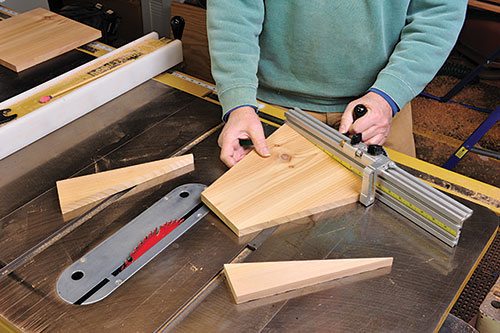
I made the planter backs out of 1×12 stock (3/4″ x 11-1/2″), cutting seven blanks 11″ long by 10-5/8″ wide. With the saw blade set square, miter both long edges of each blank at a 15˚ angle. Be sure to keep the wedge-shape cutoffs; you’ll need them later.
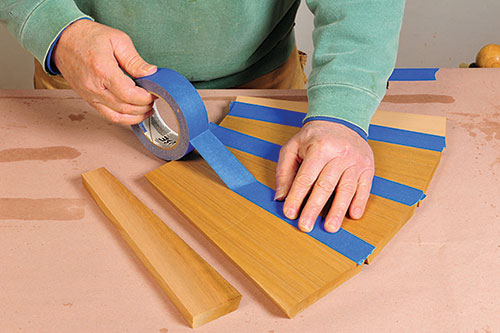
To assure the complete waterproof-ness of the planters, I glued them up using polyurethane adhesive. Start by placing three full staves, flanked by a pair of half staves outside-face-up, on a bench top covered with kraft paper or cardboard (to keep the glue off).
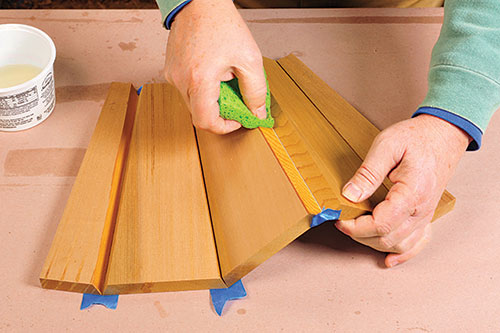
After aligning the ends of adjacent staves, butt all the pieces together, then apply a length of 1-1/2″-wide masking tape over each joint. Press the tape strips down firmly, then carefully flip the assembly over. For polyurethane glue to set correctly, one half of each mating edge must first be dampened with water. Apply a thin bead of glue on the undampened edge of each joint, then flip the assembly over and fold the planter into its half-octagonal shape.
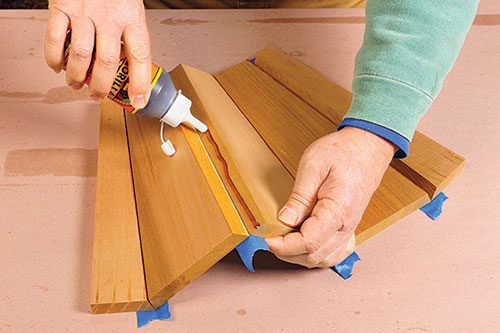
Without applying any glue to it, slip one of the backs into place, set a pair of 15˚ cutoff wedges alongside the edges of the planter, and clamp the assembly together.
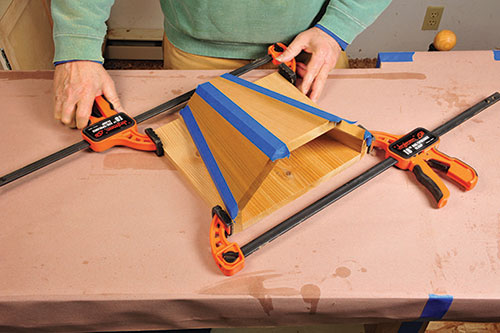
To prevent the glue — which tends to expand into a foamy bead as it dries — from running down onto the back, flip the assembly over and set it aside to dry overnight.
Creating the Bottoms
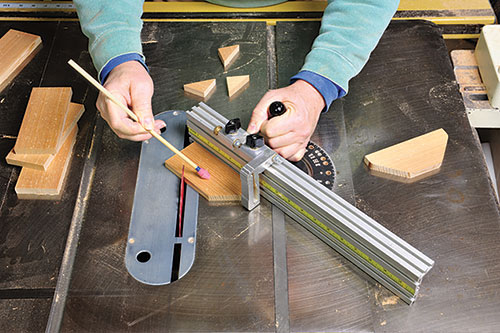
The trapezoid-shaped planter bottoms are cut from 1/2″ x 2-1/2″ x 5-7/8″ blanks. After planing some 1x stock down to 1/2″, set your table saw’s miter gauge to 45˚. Clamp a stop to the gauge’s head (or fence) so that a triangular piece will be cut off the corner of the blank. Flip the blank over and cut the other corner off the same edge. The resulting flat left between the cutoff corners should be 2-5/16″ long (see the Drawing). After cutting all seven bottoms, round over the four corners (formed during triangle cutting) with a disc sander or rasp.
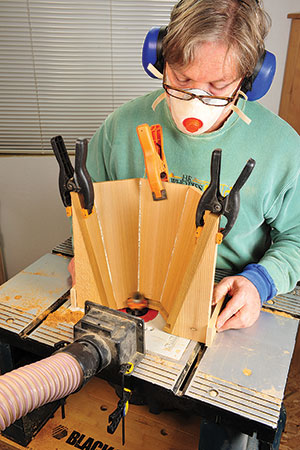
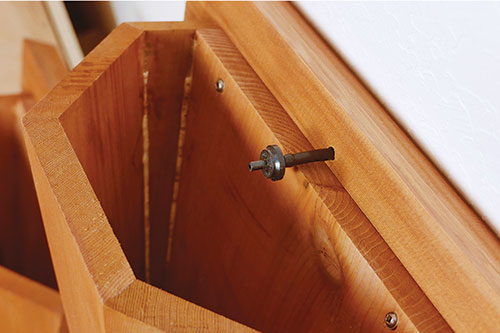
Next, I cut the dado that houses the planter’s bottom into both the partially glued-up planter and its back. For this task, you’ll need a router slot cutter set with a 1/2″ diameter arbor and cutters wide enough to produce a 1/2″-wide dado. The pilot bearing mounted atop the arbor should be sized so the bit produces a 3/8″ deep cut. With the bit chucked in the router table, set the bit’s height so that its lower cutting edge is 1/2″ above the table.
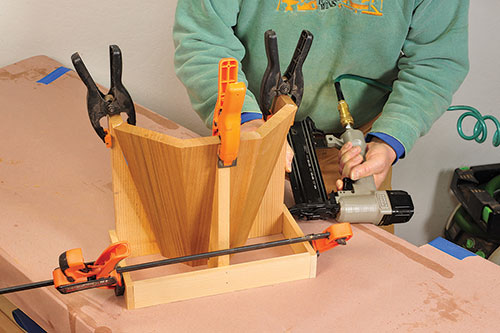
To help make the routing process safer and more controllable, I built a support cradle for the planter assembly. Take three of the 15˚ wedges (offcuts from the backs) and position them as shown in the photo below and clamp them to the planter with spring clamps. Now take three wood strips 3/8″ thick and 2″ wide and cut them to length so that they form a U-shaped skirt as shown, and nail and/or glue them to the wedges.
When you’re ready to rout the bottom slots, clamp the planter into the cradle, making sure that the bottom lies flat on the router table. Rout carefully, working around the inside of the planter in a clockwise direction. Before routing the dadoes in the planter backs, reset the cutter’s height to 3/8″ (from bottom of bit to table) and position the fence face flush with the bit’s pilot bearing. Run the backs, narrow end down, vertically past the bit.
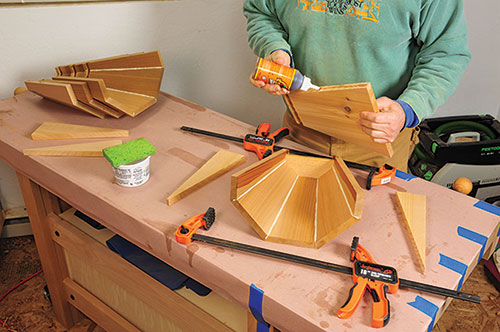
With routing complete, press the bottoms into the dadoes in the planters and glue on the backs, using polyurethane glue as before. Apply glue to the tapered edges of each back as well as the back dado; it’s unnecessary to glue the bottom into the dadoes in the staves. Clamp each planter as before, once again using the 15˚ wedges as cauls. Scrape or sand off the excess glue foam once the adhesive is completely dry.
Building the Support Frame
The next task is to build the frame that supports all seven of the planter boxes. Start by cutting the four horizontal rails from 1×4 stock (that’s 3/4″ by 3-1/2″), crosscutting each about 1″ longer than the lengths shown in the Material List. Tilt your table saw’s blade to 15˚ and rip a 2-3/4″-wide piece from each rail. Now take each rail’s narrow cutoff, flip it around and glue it to the upper back edge of the wider piece using polyurethane glue (see the Drawing). This angled “L” shape gives the rails more strength as well as helping to shed rain and hide the drip irrigation lines. Trim each rail to final length, mitering each end at 15˚.
Make the risers that join the rails next, by first cutting four 8-5/8″-long blanks from 1×6 stock. Bevel one end of each riser blank at 15˚ using either a compound miter saw or a table saw and miter gauge. I used 8 mm x 40 mm loose tenons to join the risers to the rails, plunge-cutting the mortises with a Festool Domino machine; if you prefer, you can use dowels or other joinery instead. Cut one mortise into both ends of each blank, centering it both widthwise and thickness-wise. Then cut matching mortises in the rails, locating them as shown in the Drawing. Now transfer the riser’s curved shape onto each blank using the Drawing. Cut them out with a band saw or jigsaw and sand the curved edges smooth.
Assembly and Finishing
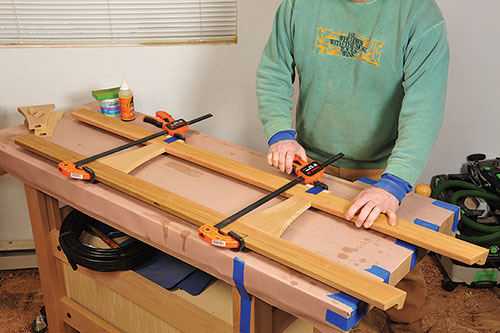
To assemble the support frame, apply polyurethane glue to all the mortises and loose tenons, slip each riser into place, and apply clamps. Before leaving the assembly to dry, clamp a couple of long, straight boards perpendicularly across the front faces of all four rails, to assure that the entire frame is dead flat.
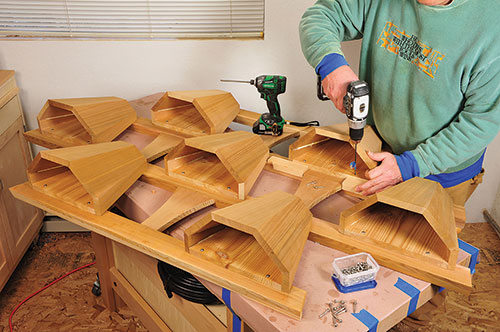
When you’re ready to mount the planter boxes, set the frame face-up on a bench or work table, making sure that all the rails are well supported. Set each box in place, spacing its top edge 1-3/8″ from the top of the rail. Position the boxes horizontally as shown in the Drawing. Using a long 1/8″-dia. drill bit (aka “aircraft” bit) chucked in a portable drill, bore two holes through each box’s back near the upper corners, spaced about 3/4″ down from the box’s top edge. Secure each box with two #8 x 1-1/4″ exterior-grade washerhead screws, which are preferable since they hold better in soft woods.
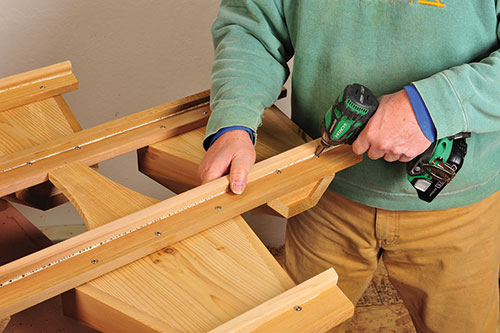
When all seven boxes are screwed on, flip the assembly over and secure the lower end of each box: Drill a pair of angled pilot holes and drive two screws through the rail into the planter’s back. For additional strength, drive three more screws through the rails into the upper part of each box. To provide water drainage for the planters, drill a 1/2″ hole through the rail and back of each box at the bottom. Finally, glue the spacer block that will support the main irrigation line to the back of the center planter box.
To protect the hanging garden from the ravages of sun and weather, I applied a coat of Thompson’s Water-Seal® to all wood surfaces, including the frame backs and insides of the planter boxes. To even up the color of the cedar, I chose an amber- tinted transparent sealer, but any good outdoor wood finish will do just fine.
Installing Drip Irrigation
Cut a 3-1/2′-long piece of 1/2″ irrigation tubing and seal off one end using a hose end clamp. Secure this main line to the center of the frame, sealed end at the top, using several 1/2″ tubing support clamps. Add a fitting at the open end of the line for connecting to a garden hose or other water supply.
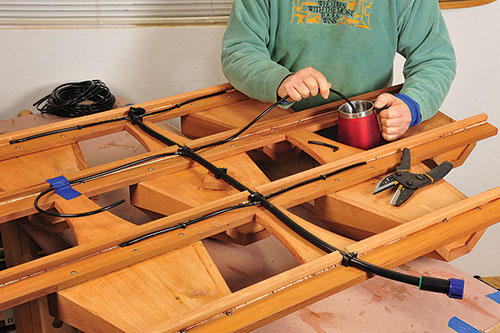
Next, using a special drip irrigation hole punch, punch holes in the main line. Insert a 1/4″ double barbed connector into each of these holes, then press a length of 1/4″ tubing into each connector. Now, fit the necessary barbed elbows onto the tubing. Drill seven 9/32″ holes through the rails, one for each planter box. Feed 1/4″ lines through these holes and fit each with 1/2-gallon-per-hour pressure compensating drippers on the end. Secure all the 1/4″ lines to the back of the rails with 1/4″ tubing support clamps.
To use the drip irrigation system after install, hook the hanging garden’s main line to an outdoor water faucet with either a garden hose or 1/2″ tubing (you may need to install a pressure regulator and/or anti-siphon device on the water line as well; consult your local garden center or drip irrigation literature for more information). In lieu of manually turning the water on and off, it’s advisable to use a drip irrigation water timer. Most models allow you to set the length of time the water will be turned on as well as how many times a week to water.
Installation and Planting
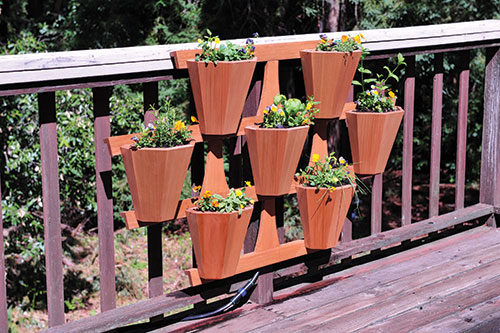
Once you’ve chosen a location for your hanging herb garden, screw the top rail to a sturdy member, such as the top rail of a deck or fence, using stainless steel, brass or bronze screws. Also secure the bottom and/or middle rails, using spacer blocks, if necessary.
Once screwed in place, you’re ready to plant your herbs. Put a handful of pea gravel in the bottom of each planter, to provide a drainage layer, then fill the planters with potting soil and add the plants of your choice.
One last suggestion: Save your jigs, support cradle and other supplies from this project. I predict that once your family and friends see your hanging herb garden, they’re going to want one, too.
Click Here to Download the Materials List and Drawings, plus a list of supplies for the irrigation system.


