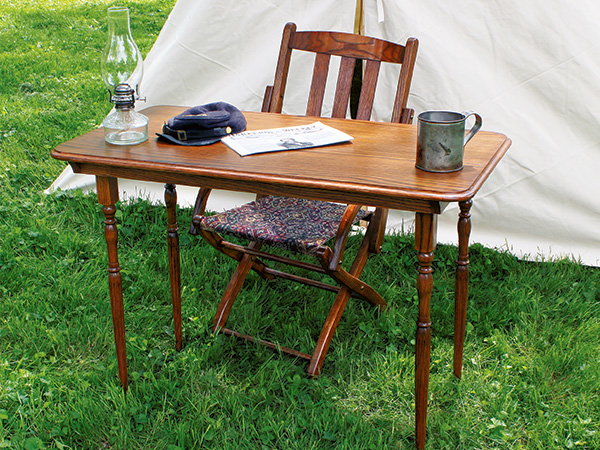
Imake a lot of reproductions of 19th-century items from the Civil War years, and if there’s any common thread in my research of originals it’s that most were items from civilian life that had been “drafted” into military use. This is especially true of good-looking, professionally made and mass-produced camp furniture. The Officer’s Camp Chair project is a good example, but literally speaking it wasn’t designed or manufactured specifically for camp use. It was among the many furniture items kept in the home for temporary use to accommodate guests or to take out doors for picnics and other activities. Once the war broke out, though, military officers were quick to learn that these folding, easy-to-stow and -carry pieces of furniture were perfect for camp life.
That’s the case with this piece, which you could consider a high-end card table of its day — the one brought out for extra guests who couldn’t fit at the holiday table.
The practice of mass-produced furniture was in its infancy, so there was no standard for stowaway tables, and they could be just about any height and made of any species of wood. Although the legs were usually lathe-turned and on the ornate side, there were tables with plainer legs. However, whether the legs were plain or turned, they were almost always square at the top and generally tapered along their length.
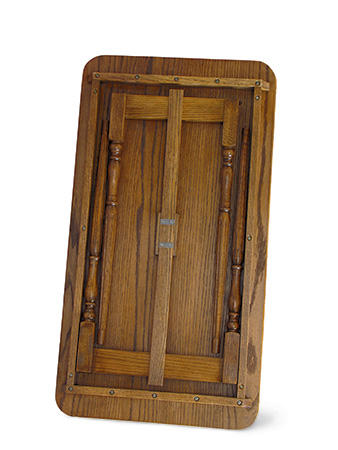
The leg sets on these folding tables were configured one of two ways. The method featured here used one leg set that extended the width from one edge of the frame under the table to the other, while a smaller leg set fit inside the larger one when folded. The other method used two leg sets of identical size, each slightly narrower than the width between the side frames. These two sets were then hinged to the tabletop in an offset manner – one to the left and the other to the right. Various means of locking the legs were also used, but the one presented here involving a long, thin wooden “spring” on the underside of the table was the most common.
Lathe-turned legs were very popular on furniture during the period, and the type most often used for these tables. As to the pattern or profile of the turned portion of the legs, however, there was nothing common about them. When it comes to recreating these items that’s a good thing, because that means there’s nothing specific that has to be carefully copied to be authentic. With that being the case, this project uses readily available stairway balusters as its legs. I’ve included a source for the balusters, but as long as you’re careful to avoid styles post-dating the period (Mission, Contemporary, Victorian, Art Deco, etc.), you can use just about any turned baluster. And of course, you can always turn your own — and we’ve provided a suggested turning pattern in the Drawings.
Making the Tabletop
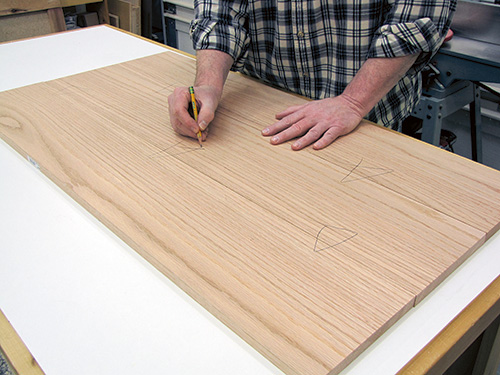
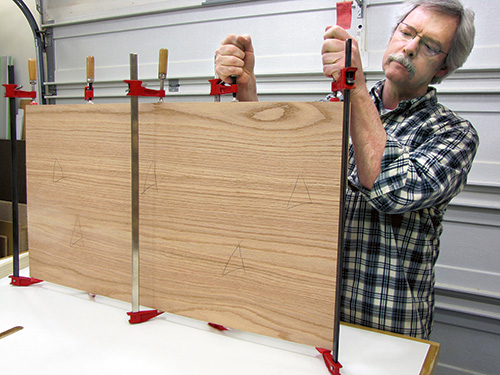
The main panel for the tabletop is formed of three pieces of 5/8″ red oak. Begin by jointing the edges for a good gluing surface. Once jointed, take the three pieces to your assembly table and swap their order around a bit to find the most pleasing grain arrangement, and then mark them to keep the order straight.
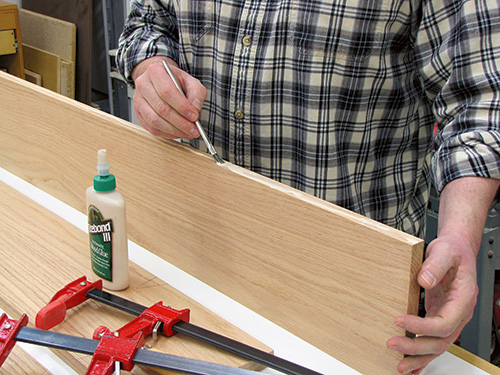
I like triangles penciled in over each joint, but any marks will do. Apply glue to the joining edges, and then clamp up. Note that I’ve alternated the side the clamps are on along the length of the panel. This distributes clamping pressure evenly and avoids bowing the panel as the glue dries.
When the glue is cured, scrape off any dried glue squeeze-out and give the panel a thorough sanding on both sides. I like to use both a powered sander and a sanding block, but always finish by hand-sanding in the direction of the grain. When it’s sanded and smooth, trim the panel to its final dimensions on the table saw.

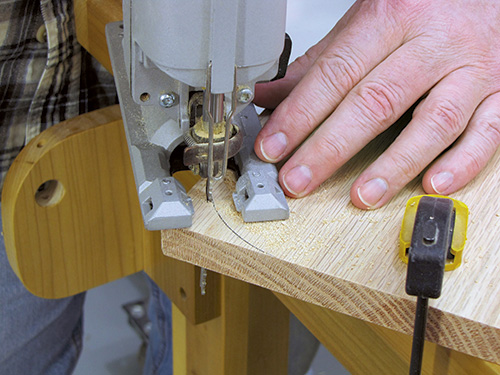
This table has rounded corners, and rather than do anything complicated (like trying to find the compass I’d misplaced somewhere in my shop), I just grabbed the closest round object of about the right size and traced around it. Worked fine. It turned out to be a radius of 2-1/2″ if you’d like to match it. To cut the round corners, a jigsaw is your best bet.
Tables of this type often had a decorative edge profile, but not always. As such, this next step is optional. The profile I’ve used here was common for the period, and is quite simple to do. You can see a section view of it in the Drawings. The shape is formed in two steps, each done with a different router bit, and can be done with either a handheld router or on a router table. The first step is to form an ogee profile on the top edge of the table. Then, install a roundover bit and route the table edge on the bottom by your preferred method.
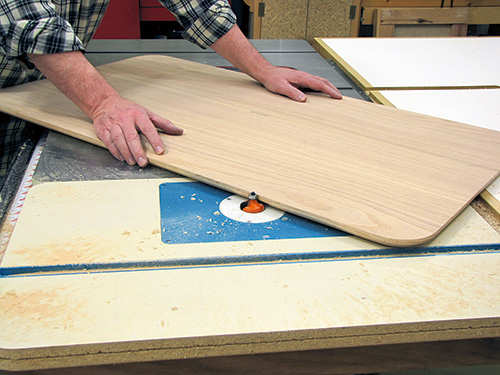
As I noted, this profile is a common one for table edges, but you could also do a bullnose edge, an ogee by itself or just a cove profile. Or, leave the table edge plain. It’s up to you.
Adding the Aprons

This type of table always had at least one set of frame pieces, located at the ends of the table. This wasn’t for appearance — the end apron served two very important purposes, the first of which was to act as a cleat or brace to keep the tabletop flat. Panels this size have a tendency to curve with the grain after milling: the effects of temperature and humidity. These end apron pieces attach solidly to the underside of the table across the grain and help to keep the tabletop flat. They also act as stops for the leg sets, preventing them from overstressing the hinges if the legs are opened too hard or if the table is pushed around while in the upright position.
Cut the end apron pieces to size, creating the detail on each end as shown in the Drawings, and then drill five evenly spaced and countersunk holes for the attachment screws in each. At just over 21″ wide, this table will definitely expand and contract with seasonal changes in humidity. For that reason, these end apron pieces can’t be glued to the table, but must be held on with screws only. Further, it has to be done in such a way that they’re solidly attached, but will still allow some panel movement. To accomplish this, elongate the pilot holes where they contact the table. By carefully working the spinning drill bit back and forth, you can “stretch” your hole a bit. The table won’t expand and contract a lot, just a few fractions of an inch, so only a bit of elongation is needed. Also, you don’t have to elongate the center hole, as the panel won’t move in the center.

Before attaching the end aprons, it’s extremely important to double check your screw depth. I’ve used #10 x 2″ plain steel flathead screws, and they were the perfect length. However, depending on how deeply you countersink the pilot holes, the length could become an issue — too deep and your screws might come through the tabletop. Insert a screw into the holes and test the depth on the table edge. Switch to a shorter screw if necessary.
Position the end apron 2-1/4″ from each end and use the holes as a guide to drill pilot holes into the underside of the tabletop. Again, be extremely careful about drilling depth — use a collar stop on the drill bit or plain masking tape as a depth guide. With the pilot holes drilled, attach both pieces. Remember, no glue!
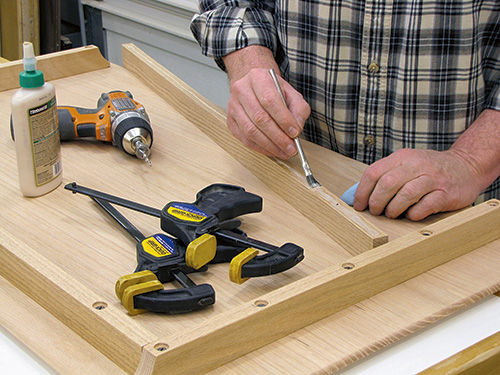
Many tables of this type didn’t have side apron pieces, so you can skip these if you’d like. However, having a frame all the way around protects the leg sets when the table is folded — they’re completely contained within the frame. Besides, not only did the original table I used as the pattern for this one have them, but I like the look of the side pieces, and so I’ve included them here. Cut the side apron pieces to length, then drill and countersink three evenly spaced pilot holes through each. There are no wood movement issues for these pieces so there’s no need to elongate the holes, and it’s fine to use both glue and screws to secure them between the two end aprons and 1-1/2″ from the table edges.
Creating the Leg Sets
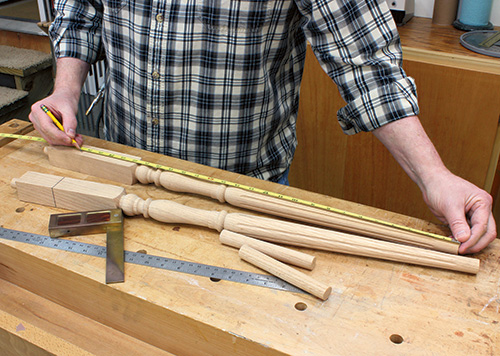
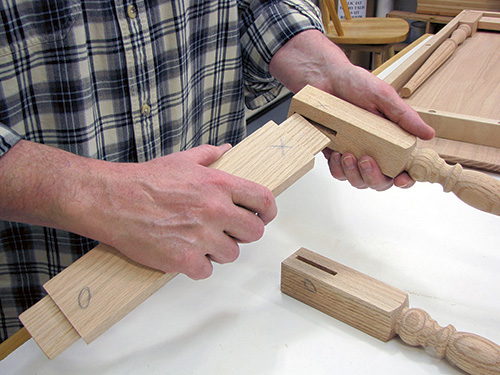
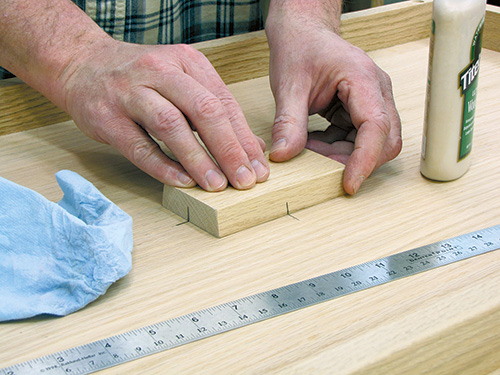
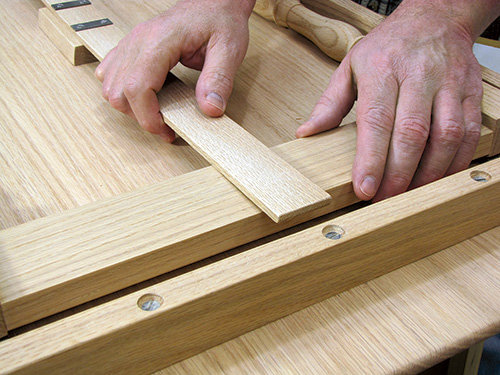
With the tabletop measuring 5/8″, the legs should be 26-3/8″ to achieve the overall table height of 27″. The balusters we’re using for legs measure 36″, but that length includes a lot of plain cylinder on what will be the bottom of the leg, and a bit more square block at the top (called the “knee”). We want all of the detailed portion to remain on the leg, so first mark the leg beginning about 1-1/4″ below where the detail ends at the bottom and squarely cut off the excess. Now, measure 26-3/8″ up into the knee and mark again. Squarely trim off the knee on your mark. This will nicely center the detail, and leave enough knee at the top to accommodate the rails of the leg sets.
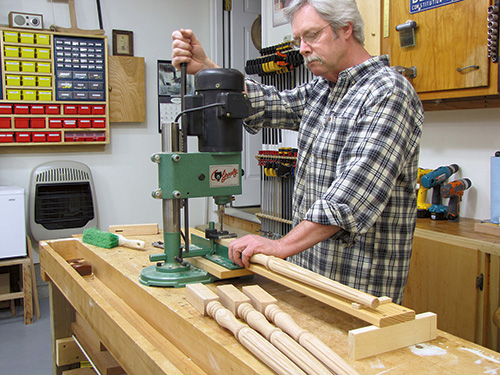
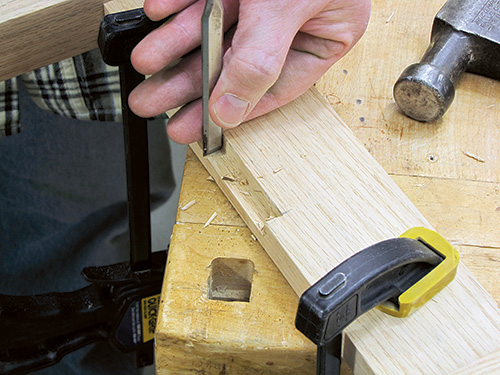
Mark the inner face of each knee for the 1/4″ x 2″ rail mortise, centering the mortise in the knee starting 1/4″ down from the top. The general rule of thumb for tenons is that they should extend no less than 2/3 of the way through the mortised component, so for the 1-1/2″ knees of these legs that would be 1″. However, for a bit of extra strength I installed a peg through the center of the knee and into the finished mortise-and-tenon joint, so I made the tenon a bit longer at 1-1/8″.
Notice in the photo that I’ve made a mortising support out of scrap wood to keep the leg steady while milling it; a thin shim attached to the end supports the narrower leg tip so the knee rests flat beneath the mortising chisel. Adjust the mortiser’s depth stop to cut a mortise deep enough to accommodate a 1-1/8″-long tenon, and mill all four of the legs. (Note that because of the somewhat ragged bottom left by most mortising chisels, you may need to make the mortises just slightly deeper than 1-1/8″.)
Cut the two rails to length (the length given in the Material List includes the 1-1/8″ on each end for the tenons).
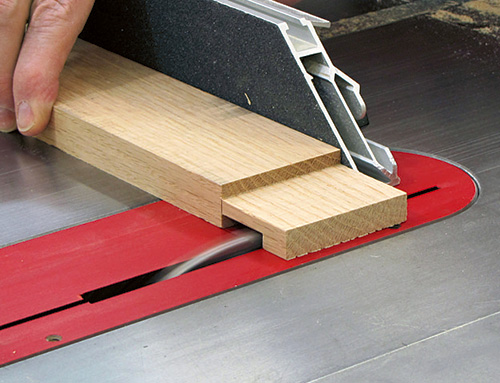
Install a dado set in your table saw, and set the blade height at exactly 1/4″. Mark the shoulder-to-shoulder length on all four sides of the workpiece, then place the workpiece against your miter gauge and line up your marks with the inner edge of the blade.
Make the first cut on your mark, then shift the workpiece position and make a series of additional passes over the dado set to create the tenon faces or cheeks. With the faces cut, stand the workpiece on edge against the miter gauge, and repeat the process to cut the tenon edges.
Do a dry assembly to test-fit everything, making adjustments as needed to trim the tenon length if you made them slightly oversized. The tenons should fit snug but not overly tight into the mortises — a too-tight fit will scrape off nearly all the glue into the bottom of the joint.
Sand the faces and edges of the tenon to ease the fit slightly if you have difficulty inserting the tenon. When you’re satisfied with the fit, glue and clamp the leg sets together.
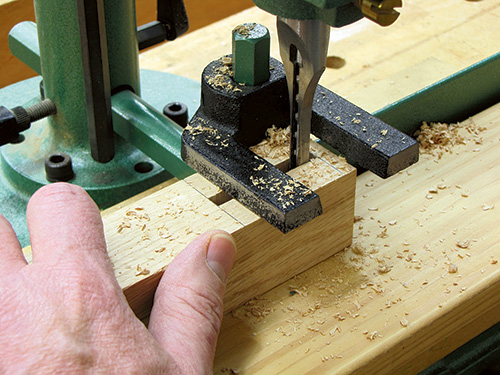
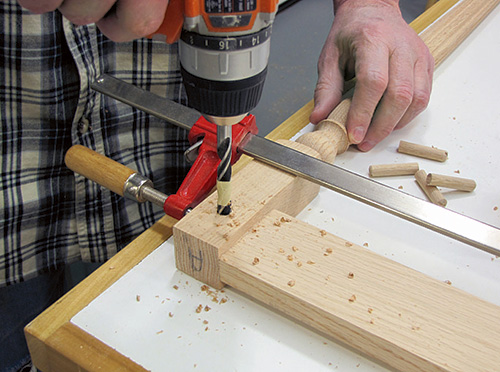
For maximum strength, we’ll make these joints pinned tenons. The joint is already very strong, but pinning it adds mechanical strength. With the leg sets flat on your work surface, drill a 3/8″ hole in the center of the leg knee for a short length of dowel, centered through the tenon on the inside; this places the hole about 1-1/4″ from the top of the leg to hit the center of that 2″ tenon.
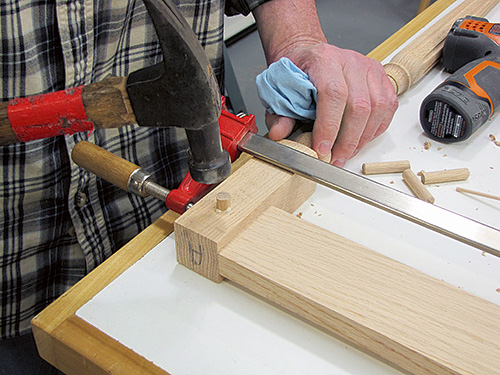
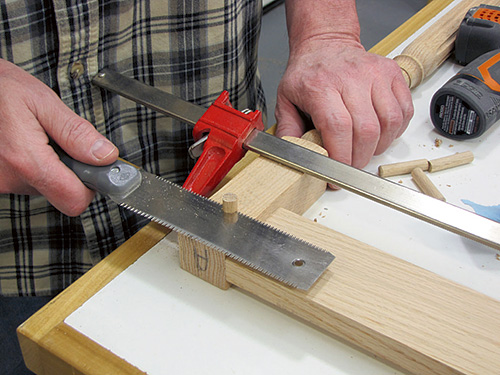
You don’t want to drill all the way through, so make the hole just 1″ deep. Glue a 3/8″ dowel into the hole, depending on what size you drilled. Wipe off any glue squeeze-out from around the dowel and trim the dowel flush with the leg.
Making the Locking Mechanism
We won’t install the locking mechanism till a bit later, but while the leg sets are drying is a good time to get the components ready, starting with the “lock block” to which the locking spring will mount. I have no earthly idea what this block of wood was actually called — in fact, it probably didn’t have a name — but I had to call it something and liked the sound of “lock block.” Cut the block to size (I beveled the outer long edges slightly, but that’s optional). Measure the underside of the table to find the exact center, and glue the block in place. Clamping this may be difficult depending on what you have, but you can weight this down to hold it firmly as the glue dries. No real need to strengthen this with fasteners; the face-to-face glue-up will be plenty strong.
The spring lock was a common mechanism for locking folding furniture and featured a thin wooden slat affixed to the underside of the table; in this case, to the block described above. The free ends of the slat fit into 3/8″ x 3/8″ x 2″ notches mortised into the inner bottom edge of the rail on each leg set. The locking action will be automatic: Just unfold the legs into the upright position, and the slat snaps into that notch as soon as the leg set is fully vertical.
The leg sets should be dry at this point, so it will be easier to mortise that notch now before attaching the leg sets to the table. The locking spring is only 1-1/2″ wide, but make this notch wider; an extra 1/4″ on each side is good for a 2″ notch. This makes the notch easier to engage should the spring slat ever warp, or possibly need to be replaced in the future.
We won’t attach it yet, but go ahead and cut the slat for the spring to width and rough length. Best to cut it a bit long, and then trim it to an exact fit once the leg sets are hinged into place.
Balusters for Table Legs?
![]()
A first reaction to using stairway balusters as furniture legs is probably surprise, but there’s really nothing incorrect about doing so if you’re concerned about being true to 19th-century designs. Lathe-turned table legs and stairway balusters are, except for length, nearly identical in most cases.
But what about style? Well, as long as you don’t use balusters in a style that’s obviously more modern – like Mission or Contemporary – it’s not an issue. The manufacturer calls the style of the balusters I chose for this project “Biltmore,” but after speaking with them I learned the name has nothing to do with the famous Biltmore Estate in North Carolina (built in 1895), nor is the baluster a re-creation of anything from the estate. (Find purchasing here.)
If these legs resemble any particular style at all, they’re probably most similar to Sheraton. But since the Sheraton style appeared in the late 18th century, it’s not inauthentic at all. The bottom line is that using balusters as table legs proves to be a viable shortcut, making this project accessible to the largest number of readers. But if you have a mind to, you can always turn your own. After all, it’s your table!
Hinging the Leg Sets
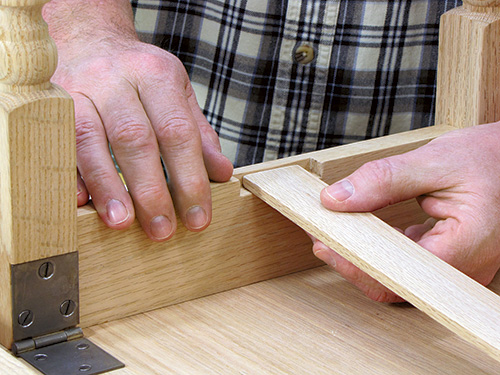
At this point, everything’s just about ready for final assembly. Cut the hinge mortise on the inner face of the leg set knees, using one of your hinges as a guide for the exact size and placement. Since we want these leg sets to fold completely flat against the underside of the table, make these hinge mortises the depth of two hinge leaves.
Now, depending on the type of hinges you find, you may need to make allowance for the hinge barrel. (If your hinges fold out perfectly flat, move on to the next section.) On the leg, this is just a matter of beveling the very end of the mortise to allow room for the hinge barrel to clear. For the hinge to rest flat on the underside of the tabletop, however, you’ll need to cut a relief into the wood in which the hinge barrel can rest, allowing the hinge to sit flat on the wood.
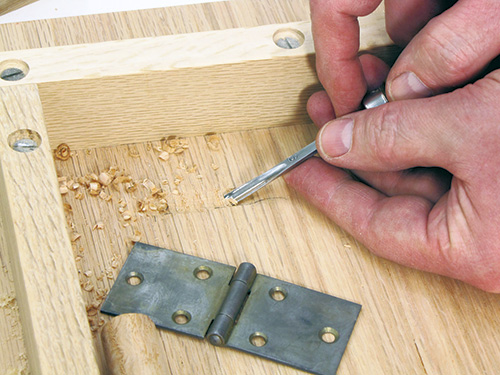
Hold the leg sets in position firmly against the end apron braces and mark the table underside where the hinge barrels touch the surface, and then use a small gouge to chisel out the relief. An extra hinge to check your work as you progress makes this easier. With all four reliefs cut, hold the leg sets in place once again and mark the hinge holes in the underside of the table. Drill pilot holes on your marks, making sure as before not to drill too deeply or you may accidentally go all the way through the table. Install the hinge screws on all four corners.
Locking It Up
The table leg sets are held in the upright position by the locking action of that wooden spring slat. However, you want that spring to push firmly against the end aprons — if there’s any play at all where the locking spring snaps into the notches, then you’ll have play in the leg sets when set up, leading to a wobbly table. For that reason, we didn’t cut the spring to length earlier.
The spring is attached to the lock block with a pair of retainers. You could screw directly through the spring, but with use the spring will eventually begin to split at the screws; plenty of originals bear this out. On the other hand, originals with metal retainers were much hardier — the retainers evenly distribute the holding power of the screws. Make a pair by cutting two 1-1/20″ pieces from a standard 1/8″ x 1/2″ steel bar stock, and drill two countersunk screw holes in each.
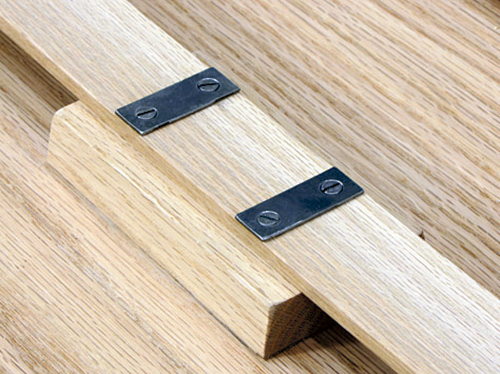
Center the locking spring on the lock block with the ends centered over the leg set notches; because the spring is still slightly long, the ends won’t snap into place. Push the locking spring down against the block and hold the retainers in place on the spring, locating them on the spring 1″ from the ends of the block, and mark the spring for pilot holes. Still holding the spring in place, drill pilot holes through the spring and into the block beneath it. Screw the retainers in place temporarily. Now, mark the spring ends where they will fit into the leg set notches. As always, err on the long side or you may have to cut a new spring. The idea here is that you’ll want the spring to fit snugly into those notches so the spring forces the leg sets firmly against the end apron/braces. Remove the spring and trim to length, then remount the spring on the block and check the fit of the ends in the notches. If it’s still too long for the ends to snap in place, trim again. However, if you trimmed carefully you may be able to use a sanding block to fine-tune the fit. Once you’re satisfied with the fit, fully tighten the screws in the spring retainers. Don’t use glue when attaching the spring to the lock block. If the spring ever breaks, you’ll need to remove it easily for replacement.
To close the table, lift the spring out of the notches and fold the leg sets flat against the underside of the 00tabletop. The spring will naturally relax, but there should still be enough tension in the spring to gently hold the leg sets in place in the folded position for transportation.
Finishing Up and Variations
A dark stain top-coated with a shellac finish was typical for a table like this, and that’s what I’ve done for mine. However, if you’re making this table for everyday use and not as an authentic reproduction, you may opt for a more modern finish. If that’s the case, a couple of coats of polyurethane will give your table excellent protection during regular use.
I used three pieces of wood to make the top for the project table, which is about the most an original table would have had. Wider lumber was much easier to come by back then, and a table of this width might have been made with only two pieces. (Some may have used even a single 21-1/2″-wide piece!) For the sake of authenticity, I wouldn’t use more than three, but if you have wider lumber, feel free to use only two.
This table’s dimensions and overall appearance are based on an original, but there’s no need at all to stick to those dimensions. You can feel free to make your table any size you like. I made the project table the exact same height of 27″ to match the original I examined. However, if you plan to use this table with the Officer’s Camp Chair, you might find it just a bit high. If so, you may want to adjust the leg length for a slightly lower table.
I don’t recommend making the table much higher than 27″, however; the higher you make it, the wobblier it will become. The same holds true for the tabletop: making it much larger will make the table top-heavy, increasing potential wobble. Many originals, in fact, had considerably smaller tabletops.


