With a large rolling cabinet, you can move it to wherever you’re working and keep all your tools handy — plus roll it out of the way whenever necessary. The cabinet I designed for my shop has a shallow upper and a deeper lower cabinet that offer plenty of storage for both hand tools and portable power tools.
The two cabinets are constructed separately, then bolted together. This not only makes the overall project easier to build, but also provides versatility. Most of the cabinet is made out of affordable shop-grade plywood, with solid wood used just for the door frames. To speed up construction, I didn’t bother edge banding the plywood, joined all carcass parts with biscuit joinery and built the door frames with loose tenons.
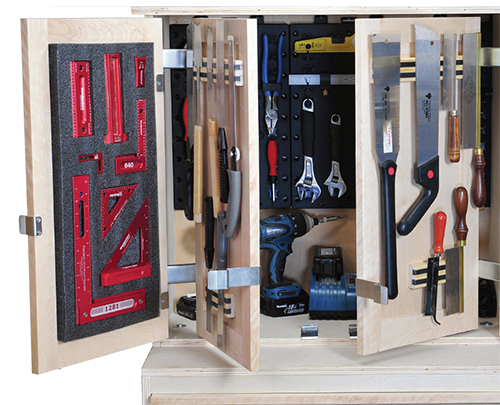
Among the cabinet’s coolest features are the double-layer doors on the upper cabinets that swing on special tandem hinges. Each door has a pair of twin handles: Pull one, and only the outer door opens, revealing small tool storage on the inside faces of the doors. Pull the other, and both outer and inner doors open, revealing the contents of the cabinet. To make them even more useful, the outer door panel surfaces are magnetic chalkboards. You can write part dimensions, notes, etc., with regular chalk and attach small magnets to hold photos, receipts and more.
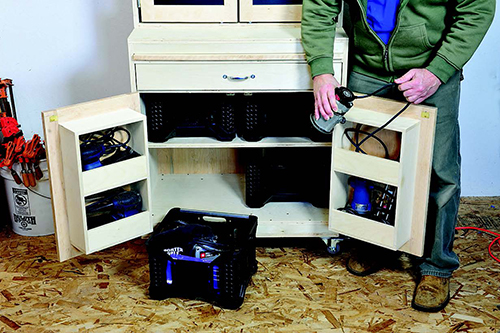
The lower cabinet features a shelf, drawer, door with cubbies and an interior shelf and space for four plastic “Blitz Box” bins, just right for storing larger portable power tools together with their supplies and accessories. To make the tool cabinet easily moveable, it rides on 3″ polyurethane wheels, which can roll easily even over uneven floors.
Constructing the Carcass
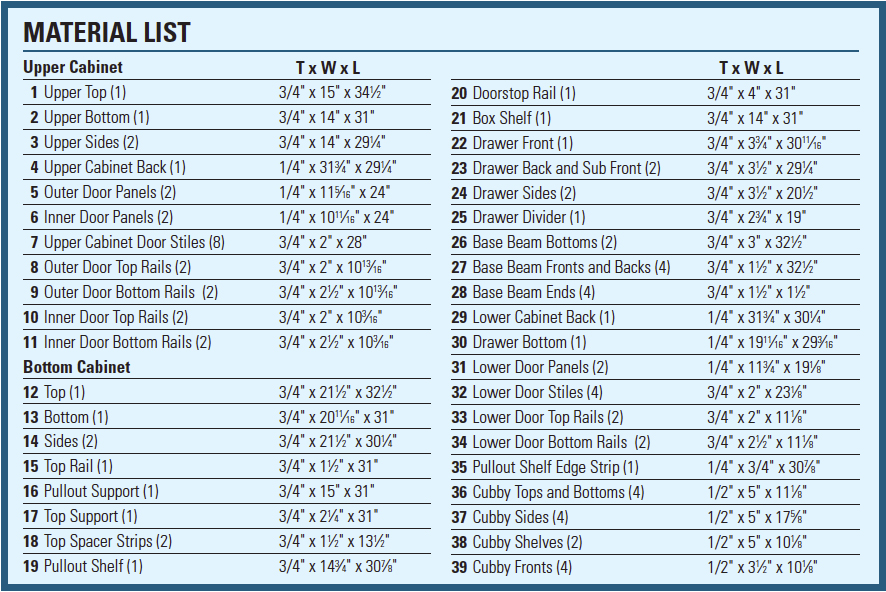
The first step is to cut out all the cabinet’s plywood parts. This requires two 4 x 8 sheets of 3/4″ ply, two of 1/4″ ply, and a single 5 x 5 sheet of 1/2″ ply. Any good quality plywood will do. To make the most of each sheet, I used a free panel optimizing program. I laid each full-size sheet on a pair of sawhorses and crosscut it into more manageable size pieces using a small circular saw guided by a straight board clamped atop the sheet.
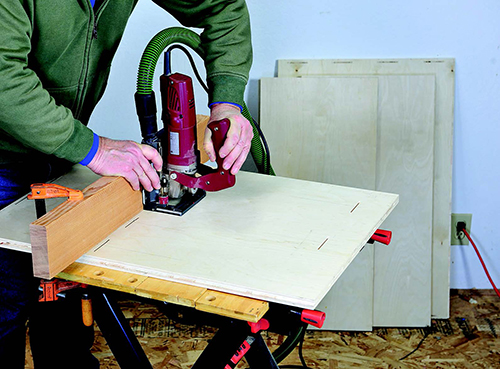
When all the plywood parts are cut to size, you’re ready to cut slots for the #20 biscuits used to join the carcass. For parts that butt together at the corners (sides and bottom of the cabinets), I flipped the biscuit joiner’s fence down to the 90˚ position and adjusted the height of the cutter to center the slots on the 3/4″ plywood. After marking the slot positions along the width of the parts, I cut slots on the ends of panels by setting the fence atop the stock. To cut matching slots on the faces of mating parts, I positioned them upright on the workbench and set the biscuit joiner’s fence on the plywood’s edge. I cut slots in parts that join in the middle of a panel with the joiner’s fence set flat. I plunge cut the slots in the ends of parts with the panel and the joiner’s base flat on the bench top.
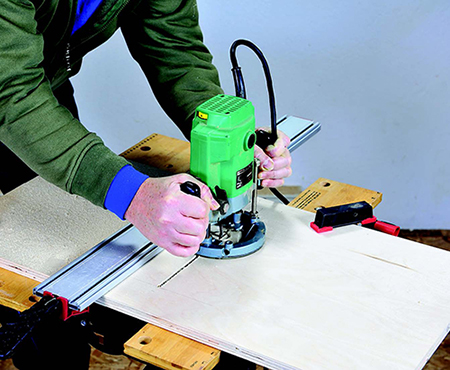
There are a couple of other machining tasks to attend to: First, cut a 1/4″-wide, 3/8″-deep rabbet on the back edge of both the upper and lower cabinet top, bottom and sides. Next, using a 1/4″ straight bit in a plunge router, cut a centered through slot in the pullout support, located as shown in the Drawings. After routing, glue and nail/screw the top support perpendicular and flush to the back edge of the pullout support. Also, glue the edge band to the pullout shelf’s front edge, then use a plunge router fitted with a 3/4″ bull-nose bit and an edge guide to plow a 5/16″-deep rounded groove on the underside of the shelf, just behind the edge band. This acts as a finger groove for pulling the shelf out. Finally, bore four 5/16″ holes through both the upper cabinet bottom and lower cabinet top, positioning them as shown in the Drawing. Drive a 1/4″ T-nut into each of the holes from the underside of the lower cabinet top. These are used to bolt the upper and lower cabinets together later.
Gluing up the Carcasses
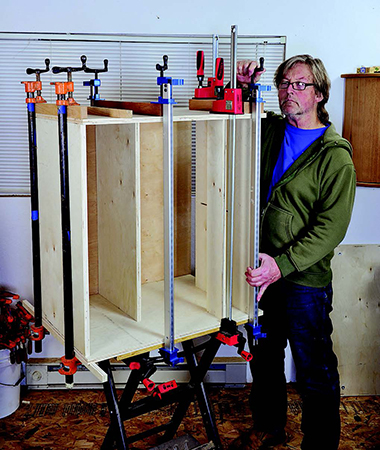
Starting with the upper cabinet, glue the bottom to the sides first, and clamp them together, making sure to keep their front edges flush. Now glue the top onto the sides, leaving it overhang the sides’ front edges by 1″. Before leaving the assembly to dry, measure to make sure that the cabinet’s inside diagonals are the same. If not, the cabinet isn’t square and needs to be racked one way or another until the diagonals match.
Assembling the lower cabinet is best done in three steps. First, set one of the sides outside-face-down on a small work table. Put #20 biscuits into all the slots, but DO NOT glue them. Then, set the pullout/ top support, door stop strip, box shelf, and cabinet bottom in place. Now glue biscuits into the slots on the other cabinet side and glue it onto on the upper ends of the bottom, box shelf, etc. After carefully aligning all parts as shown in the Drawing, apply bar clamps to pull all the joints tight. Check to make sure the assembly is square before leaving it to dry. After an hour or so, unclamp the cabinet, flip it over, and glue the other side in place.
Next, remove all clamps and turn the cabinet right-side-up. First, glue and nail the two top spacer strips onto the sides, making sure that all top edges are flush. Now glue on the top using bar clamps and cauls to clamp the parts tightly together. Next, apply glue to the ends and upper edge of the narrow top rail and install it below the top, using small clamps to secure it. Gluing up the twin base beams that support the cabinet on its casters is a simple matter. Start by gluing and nailing/screwing the 3″-wide bottom to the two 1-1/2″-wide front and back pieces. Cap the ends, then assemble the other base beam and leave them both to dry. Attach the casters to the bottom of the beams with #10 x 1-1/4″ panhead screws.
Building the Doors
To keep the tool cabinet’s doors strong but simple, I used basic frame-and-panel construction. I cut out all the frame stock (as well as the edge band for the pullout shelf) from 4/4 birch lumber, which I thickness planed down to 3/4″. After cutting all the rails and stiles to final length, as specified in the Material List, I plowed the grooves that hold the panels using a router table fitted with a 1/4″-wide three-wing slotting cutter.
Set the bit’s height to center the groove on the 3/4″-thick stock, and adjust the table’s fence to yield a 5/16″-deep cut. Rout all the rails first along the entire length of each inside edge. The grooves on the stiles are stopped short of the ends, so they don’t show on the edges of the doors. Start by positioning the stile’s end just past the bit, then carefully press it into the cutter until it bears against the fence. Feed the stile along until its far end is about an inch shy of the bit, then carefully pull it away from the fence to complete the cut.
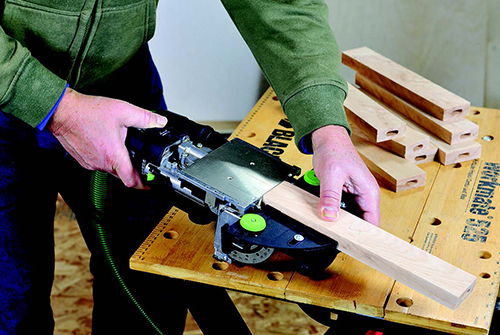
To attach the frame members, you can use any joinery method you wish. Since I’m fortunate enough to own a Festool DF500 Domino machine, I built my frames using their 8 mm x 40 mm loose tenons. After setting the Domino’s fence to center the slot on the thickness of the frames, I slotted the ends of the rails first, using the trim stop accessory to center the slots side-to-side. After slotting both ends of the 2″-wide upper rails, I reset the trim stop and slotted the 2-1/2″-wide lower rails.
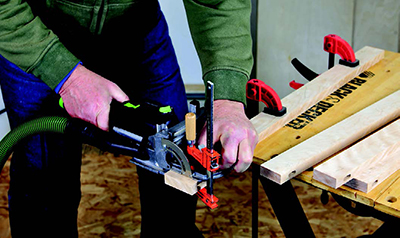
To slot the stiles I first removed the trim stop, then clamped a small wood stop block to the Domino’s fence. I set the block so that the slots in the stiles would match those in the upper rails. Since each frame member is machined face down, I slotted only the upper ends of the right-hand stiles first, then repositioned the stop and slotted the left-hand stiles. Repeat the process for slotting the stiles for the bottom rails.
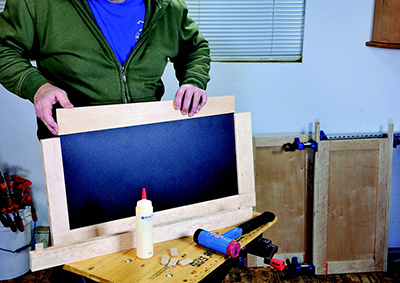
Now you can assemble the doors one at a time. First, spread glue in all the slots and glue the loose tenons into both stiles. Then, set the upper and lower rails onto the tenons in one stile. Slide a 1/4″ plywood panel into its slot and press the other stile into place. Clamp the assembly together, checking for squareness before setting it aside to dry. Once all door frames are dry, scrape off any glue squeeze-out and sand them smooth.
Making the Drawer and Cubbies
To build the tool cabinet’s large drawer, start by cutting a 3/4″-wide, 3/8″-deep rabbet across the inside ends of both drawer sides, using a dado blade and a miter gauge on the table saw. Reset the dado for a 1/4″-wide cut, and plow a 3/8″-deep groove on the inside faces of both sides, back and sub-front, spacing the groove 5/16″ up from the bottom edge. Glue up the drawer, capturing its plywood bottom in the groove. Secure the sides by driving nails through the rabbet joints at each corner. Check for squareness, then glue and nail the drawer divider in place, centering it widthwise.
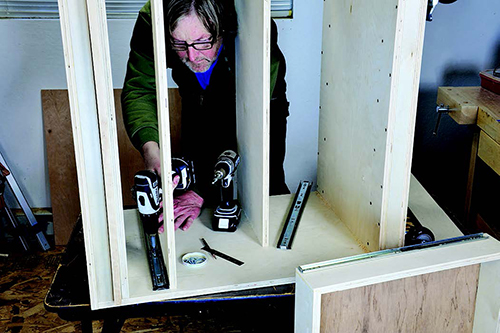
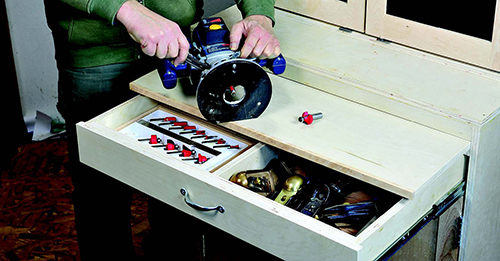
The drawer mounts in the cabinet on a pair of 20″ full-extension drawer glides. After removing the center slider from each glide, screw it in place inside the lower cabinet. Screw the center sliders onto the drawer sides, centering them on a line spaced 3/4″ up from the bottom of each side. After fitting the drawer onto the glides, tweak its position as necessary until it’s level and the sub-front is flush with the edge of the door stop rail. Drive four #8 x 1-1/4″ screws through the sub-front from the inside, then set the drawer front onto it. Once the drawer front is level and evenly spaced in the opening, press it onto the screw tips. Open the drawer and drive the screws all the way in.
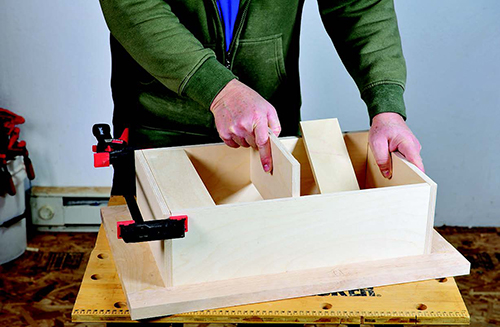
The 1/2″ plywood cubbies are built to fit into the recesses on the back sides of the lower door frames. After dry assembly, glue and nail the two fronts and shelf onto one of the sides, positioning them as shown in the Drawing. Glue/nail on the other side, then the top and bottom. Seat each cubby fully into its door recess and secure it with four #6 x 1″ screws driven at an angle through the sides and into the edges of the stiles.
Mounting the Doors
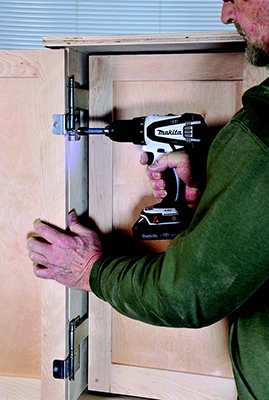
To mount the double pair of doors on the upper cabinet, use the baseplate template supplied with the Rockler tandem door hinge set to mark out the hole locations on the cabinet sides. Instead of just using these marks as drilling guides, I prefer to actually position the hinge baseplate over the marks, then use a self-centering bit to drill the screw pilot holes. That ensures accuracy.
After screwing on all four baseplates, use the hinge leaf template to mark the screw holes on the edges of the upper door stiles, taking care to mark both the inner and outer door sets correctly. Again, instead of simply using the marks, I prefer to actually clamp each door onto its hinges, center the marks in the hinge holes, then drill pilot holes using the self-centering bit. Once the inner doors are attached, I set them in their closed position, then proceed to mount the outer doors on their hinge sets. Finish by installing the special stop plates and door pulls, following the included directions.
The lower cabinet doors are much simpler to mount, requiring only two pairs of heavy-duty 3″ removable-pin butt hinges. First pull the pin on each hinge, and screw on one half of each to the inside front edge of the cabinet sides, locating them as shown in the Drawing. Attach the corresponding hinge halves to the door stiles, positioning each to match its counterpart; no mortising is necessary. Set the doors in place and drive the hinge pins back in. To keep the doors closed, mount a pair of low-profile magnetic catches to the underside of the door stop rail. Finally, screw a pair of simple steel pull handles to the stiles of both lower doors, as well as a single matching pull centered on the drawer front.
Final Assembly
It’s time now to attach the 1/4″ plywood backs to both upper and lower cabinets. Put a small bead of glue into the rabbet around the back edge of each cabinet before slipping the back in place and securing it with small nails or 5/8″-long, 18-gauge fasteners driven with a pneumatic nail gun.
It’s a good idea to ask for a friend’s help with the next few steps: Set one side of the lower cabinet down on a low work table and clamp the two base beams to its bottom, positioning the beams as shown in the Drawing. (Make sure the fixed casters align with the left side of the cabinet.) Secure each beam by driving about a dozen #8 x 1-1/2″ wood screws through the cabinet bottom into the beam’s front and back rails. Now set the cabinet on the floor and lock its two swiveling casters. Lift the upper cabinet (with doors strapped shut) onto the lower, position its sides and back flush, and drive 1/4″ x 1-1/2″ bolts fitted with fender washers into the T-nuts in the four mounting holes.
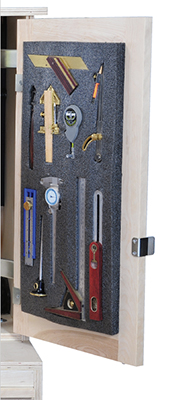
Slide the pullout shelf into its recess and drive a #8 x 1-1/4″ washerhead screw up through the support shelf slot and into the underside of the shelf. Attach the drawer to its glides, and you’re done — unless you want to add hardware fittings or accessories to customize the cabinet to suit your needs. For my cabinet, I screwed a couple of magnetic strips to the upper cabinet’s inside doors, to hold all my hand saws and mounted ToolHANGER pegboard (http://hansenglobalinc.com) on the inside of the cabinet, using their special hooks and fittings to hold assorted hand tools. I also attached pieces of 1-1/8″-thick FastCap® Kaizen Foam to the backs of the outer door panels. I cut pockets into the foam to hold an assortment of marking and layout tools.
Click Here to download a PDF of the related drawings.
Hard to Find Hardware
100-lb. Zinc Over-Travel Drawer Slides (1 pr.) #45953
Rockler Tandem Door Hinge Set (2 sets) #59882
3″ Casters, Rigid (1 pr.) #35340
3″ Casters, Total-Lock Swivel (1 pr.) #38865
18″ Magnetic Tool Holders (2) #81281
FastCap Kaizen Tool Storage Foam (1) #43845


