In this episode of Advancing Your Skills, Ian Kirby demonstrates how to assemble handmade drawer boxes.
Advancing Your Skills is the third volume in The Way to Woodwork series. The episodes in Advancing Your Skills build on the concepts taught in Essential Starters and Building on Basics. Woodworkers of all skill levels will find this volume educational and entertaining. You’ll learn more advanced woodworking skills and joinery, including detailed instruction on how to hand-cut dovetail joints and an introduction to machine cut dovetail joints. Designing projects with mock-ups and project design (proportions, form, and space) are also covered using a project as an example.
Watch – The Way to Woodwork – Volume 3
Advancing Your Skills – Ep. 12 – Assembling Handmade Drawers
Drawer Slip and Bottom Assembly


Making Drawer Slips
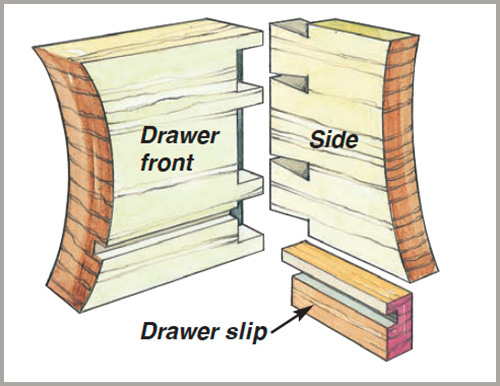
Cut the slip to size: Cut the slips from the same material as the drawer sides. Saw the groove in each slip on the table saw before sawing the slip to width —about 1/16″ wider than need be. Make an extra piece to check the fit of the tongues that you will make on the drawer bottom. Plane off the mill marks on the grooved face and the top edge that will be visible from inside the finished drawer.
Make the front joint: The slip is held in the groove in the drawer front by a tongue, which amounts to a bare-faced mortise and tenon. Mark the shoulder with knife and try square, cut it with a dovetail saw, and clean it up with a chisel.
Polish the slip: Shellac and wax the top edge of the slip.
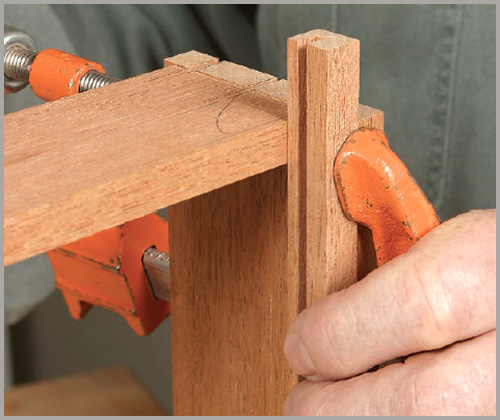
Glue the slips into place: Light spring clamps hold the drawer slips firmly to the sides. Check that the shoulder of the tongue is tight to the drawer front, and clamp the top edge of the slip tightly to the bottom edge of the drawer back.

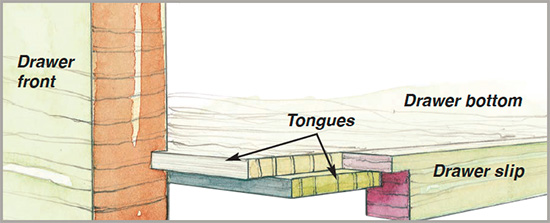
Prepare the bottom: Glue up boards to make the bottom and plane to 1/4″ thick. The long grain of the solid-wood bottom runs from side to side. This al-lows for shrinkage and expansion front to back. If the grain were made to run front to back, expansion of the bottom would either jam the drawer shut tight or break the case open. The bottom has tongues on three sides to fit the grooves in the slips and the drawer front. The tongue on the front is on the top face of the drawer bottom. The tongues on the sides are on the bottom face of the drawer bottom.
Size the bottom: Plane the end grain of one edge square to the front edge.
Make the first side tongue: Mark the tongue with a cutting gauge and cut it with a shoulder plane. Check it for a sliding fit using the spare slip.
Mark the second side tongue: Fit the shoulder of the first tongue tight to the bottom of its drawer slip and knife the shoulder line of the second tongue, using the drawer slip as a guide.
Cut to length: Leave 3/16″ for the tongue beyond the shoulder line you just knifed and saw off the excess material.
Make the second side tongue: Cut the tongue with a shoulder plane and check it for a sliding fit with the spare slip.
Flush the slip and the bottom: Using the spare drawer slip as a guide, plane any excess from the top face of the drawer bottom to make the two parts flush.
Insert the bottom and square the front edge: Slide the bottom into place. If it doesn’t fit square to the front, remove and adjust accordingly. The bottom should slide in and out with little effort so it can shrink and expand easily.
Make the front tongue: The tongue on the front is on top of the drawer bottom. This means that if there is a little shrinkage in the drawer, any gap will be out of sight on the bottom. Even a dressmaker’s pin can’t fall into a crack.
Cut to length at the back: Leave the back projecting 1/4″ or less.
Watch more episodes from The Way to Woodwork – Building on Basics:
Full series available now to print subscribers!
2. Using Mock Ups to Design Projects [1:56]
3. Bedside Cabinet – Introduction [2:46]
4. Fitting a Door and Choosing Hardware [11:36]
5. Standing Desk – Introduction [2:21]
6. Handmade Drawer – Overview [2:37]
7. Fitting Drawer Parts [8:13]
8. Marking Single Lap Dovetails [4:28]
9. Cutting Single Lap Dovetails [13:54]
10. Marking and Cutting Through Dovetails [7:14]
11. Introduction to Machine Cut Dovetails [1:53]
12. Assembling Handmade Drawers [3:37]
13. Fitting the Drawer Bottom [5:43]
14. Fitting the Drawer in the Cabinet [3:26]
Did you miss Vol.1, Essential Starters or Vol.2, Building on Basics?
Watch The Way to Woodwork, Vol. 1, Essential Starters.
Watch The Way to Woodworker, Vol. 2, Building on Basics


