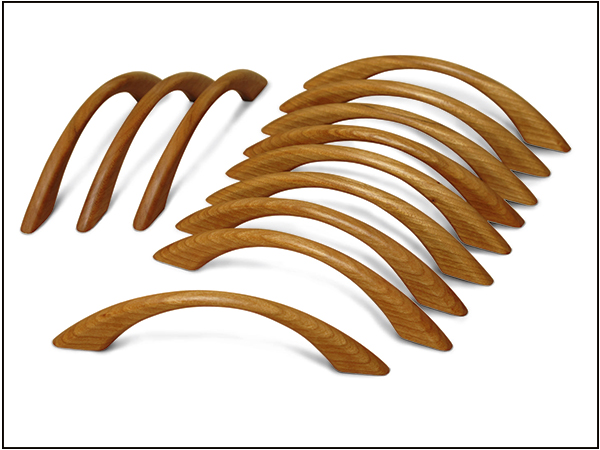
Recently, I needed some door and drawer pulls for a kitchenette I’m building, and this idea for wooden bow pulls hits me. I wondered … can it be done, and would they be strong enough? Off to my shop I go to make a test pull, and I learn both answers are yes! The next challenge was devising a way to make a bunch of them safely, quickly and uniformly. After lots of head scratching, I came up with the steps to accomplish the task, and I found the process to be much simpler than I originally imagined. So follow along and make some for yourself.
I chose cherry for my pulls, but any closed-grained hardwood would be fine. Stay away from open-grained woods like oak; they break easily when their lengths are short. This is a property of wood called “short grain,” and the grain of these pulls is “short” from the base up to the arch. Keep in mind these are wooden pulls and more delicate than their metal counterparts. They’ll be sturdy enough for almost every situation, but I would avoid them in high traffic areas and areas where children play.
There’s hardly any material expense for making a dozen of these pulls — maybe $20 if you were to buy everything new. As for time, it took me about four hours to make 12, and most of that time was spent hand sanding the rounded-over edges.
Construction Notes
You’ll need the following tools to make these pulls: jointer, thickness planer, drill press, band saw, spindle sander or sanding drum accessory for a drill press, stationary belt sander or disc sander, palm-size router, and a 1/8″-radius roundover bit. Make sure your machine setups are square; otherwise the pull shapes will not be consistent.
Making pulls like these one at a time would be tedious and dangerous. They’re too small to hold individually and machine safely. I devised a system where pieces are “ganged” together in a stack so each machine operation acts on six pulls at once. Almost every step in the process uses double-stick tape to hold pieces together, or secure pieces so they can be machined in some way. A lot depends on this tape, so you want to use the best you can buy. There are many double-stick tapes on the market. Most are fine for their intended use, but for this work you need really good tape. I use 3M brand #343 Scotch Carpet Tape, which has a very thin center membrane so there’s minimal movement between joined wood pieces, and the adhesive is super strong. The only negative is it leaves residue on the wood that you will have to work to remove (more about that later).
Assemble the “Blank” to Make 12 Pulls
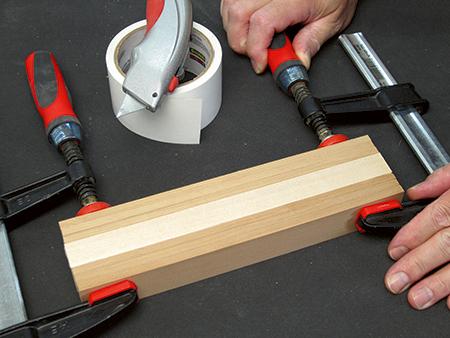
The steps given here will show you how to make 12 pulls at once, but you could use the same steps to make any quantity. Make a few more than you actually need just in case there’s a failure or two during the fabrication process.
Start by choosing some nice straight-grained wood for your pulls, and cut it into six pieces that are 1/4″ thick x 1-1⁄4″ wide x 10″ long. Also cut a piece of scrap wood the same width and length, but 3/4″ thick. Place this piece in the center of the stack. It will become the same shape as the pulls, and you will use it later as a platform to rout the rounded-over edges on the pulls. Join all the pieces with double-stick tape. This assembly is called the “blank.”
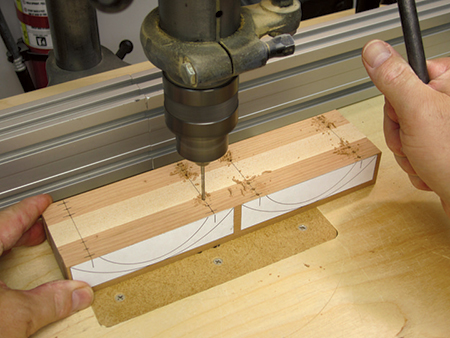
Make two photocopies of the full-size shape template shown in the drawing. Cut out the paper shapes following the rectangular outlines. Adhere these templates to one face of the blank with the template (pull) bottoms aligned to the edge of the blank, and leave a 1/4″ space between the pieces of paper. Lay out the screw mounting holes on the bottom of the blank. Be precise: use an awl to tap a starter point at each mark, and then drill the holes.
Cut the Shapes
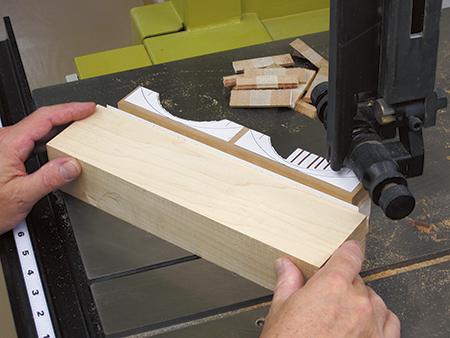
You’ll need a wooden support block to accomplish the next series of steps. Fabricate one out of hardwood or fiberboard. Size it to 2″ or 21⁄4″ thick x 3″ wide x 12″ long, and make sure it’s perfectly square.
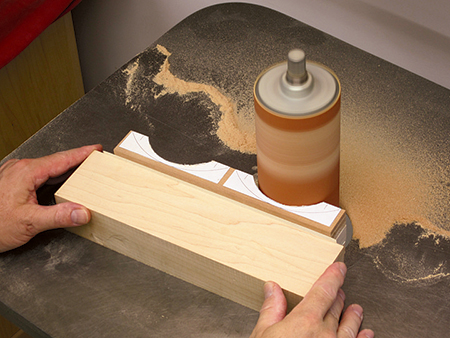
Using double-stick tape, adhere the blank to one side of the support block. Orient the blank so the paper templates are up and the bottoms of the pulls are out. Cut the inside shapes of the pulls, and then sand the sawn edges smooth. Separate the blank from the support block, flip it around and adhere it again to the support block with a new piece of double-stick tape, and then cut the outside shapes of the pulls.
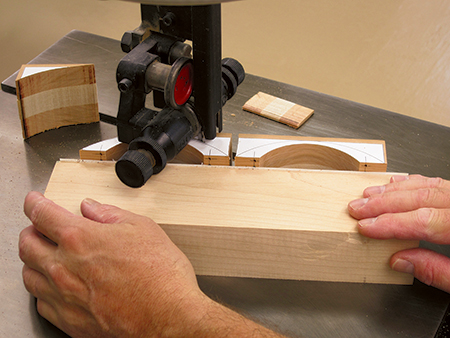
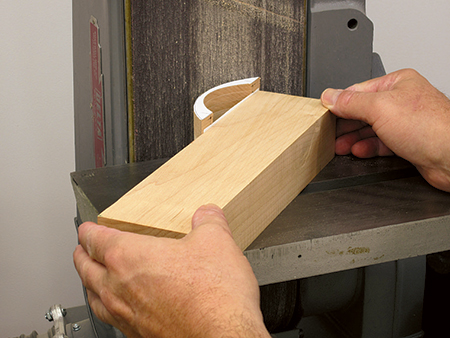
Separate the two pull stacks from the support block. Be careful that the stacks don’t shift. Adhere one stack at a time to a side of the support block so the pull ends overhang the end of the support block by about 1/8″. Sand the top shapes of the pulls.
Carefully separate the pulls from each other and the center scrap wood pieces. Remove all of the double-stick tape. Use acetone to remove the tape residue on the pulls (read and follow the warnings on the acetone container). Acetone will bead up the residue; other solvents will melt it and make more of a mess.
Round Over the Edges
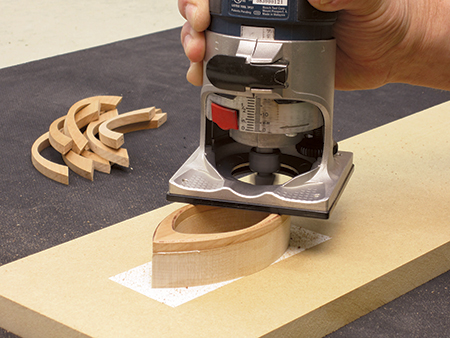
Using double-stick tape, adhere the two 3/4″- thick pull shape platform pieces face down to a scrap piece of 3/4″ plywood or fiberboard. Orient the pieces so their bottoms are together, creating a lens shape. Use small pieces of double-stick tape to adhere a pair of pulls to the tops of the platforms. Align the pulls to the platforms. You’ll find some variations since half the pulls were made with one platform, and the other half with the other platform. Flip the pulls around until you get the best shape match, and then rout the rounded-over edges. Rout one side, flip the pulls over and rout the other side. Do the inside edges, too. When you’re done routing, repeat the acetone step to remove any new or remaining tape residue.
Now the real work begins! Hand sand the rounded-over edges, starting with 120-grit sandpaper and ending with 180-grit. Fine grit sanding sponges can be helpful to refine the pull shapes.
Finish and Mount
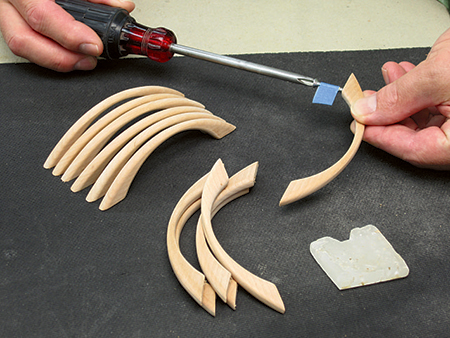
Pre-thread the pull screw mounting holes now to minimize the chance of splitting them later when they are mounted to your cabinetry, as shown in the photo.
Apply your favorite finish. I used natural Danish Oil finish on mine. Allow the finish to dry, and then your pulls are ready to be mounted and used.


