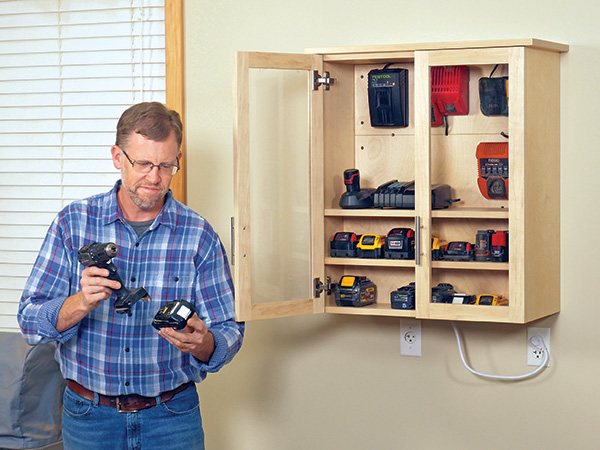
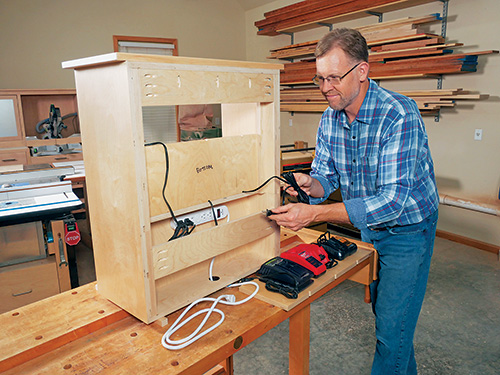
Twenty-five years ago, about the only handheld power tools that could run on a battery were drill/drivers. Now, virtually every power tool has a cordless option. If you’ve been bitten by the “cordless” bug like me, you’ve got a bunch of chargers and batteries to organize! I used to store my chargers in a jumbled mess on a shelf, untangling and plugging them in one at a time when duty called. But this little charging cabinet is going to change all of that for me — and I hope it will help you, too! Its upper two back panels are removable from in front, so you can hang those chargers that have T-slots vertically instead of piling them all on a shelf. But there’s also a shelf inside for other chargers that just can’t be hung. All the cords feed through small holes in the top two back panels and into a hidden back cavity, where they plug into a power strip. That way, they’re always energized but without a “spaghetti junction” of cords to see or fiddle with.
Building the Cabinet Carcass
This cabinet’s side panels will join to the carcass top and bottom panels with rabbets, and its upper and lower shelves will fit into dadoes in the side panels. To ensure that this side panel joinery matches and that the other components will fit into the rabbets and dadoes squarely, it helps to make both side panels from a single piece of plywood to begin with. So rip and crosscut a 24″-wide x 29-3/4″-long panel to size.
Load a wide dado blade in your table saw to cut the top and bottom rabbets into this combined side panel. Raise the blade to 1/2″ above the saw table, and install a sacrificial fence facing on your rip fence so you can bury the dado blade partially into it. Adjust the rip fence so the blade projects the same distance out from the fence facing as the thickness of the plywood you’re using for the project. (These days, it typically will measure about 23/32″ thick, but to my surprise, the Baltic birch I used happened to be a full 3/4″ thick.)
Make a test cut on a piece of scrap to ensure that the dado blade is set correctly, then carefully mill a rabbet across the inside face of the plywood panel on both ends.
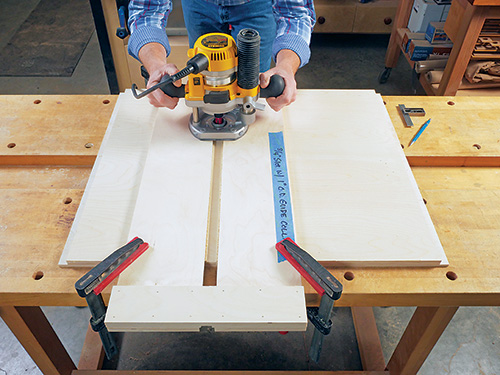
Next, plow a pair of 1/4″-deep dadoes across the same face of the plywood. Locate these dadoes 5-5/8″ and 11-1/4″ up from one end of the plywood panel. These will house the upper and lower shelves, so their width should match the plywood thickness you’re using. To mill these dadoes, I used a 3/4″-dia. straight bit and a shop-made jig with a slot that fits a 1″ O.D. guide bushing for a handheld router. When clamped in place, the jig ensures that the dadoes will be perfectly straight. But, you could also adjust the width of your table saw dado blade and cut them that way instead, if you prefer.
With the joinery now milled, switch to a regular saw blade in the table saw so you can rip each carcass side panel to 11-3/4″ wide. Rip and crosscut two 11-3/4″-wide x 24-3/4″-long plywood panels to size for the carcass top and bottom panels, too.
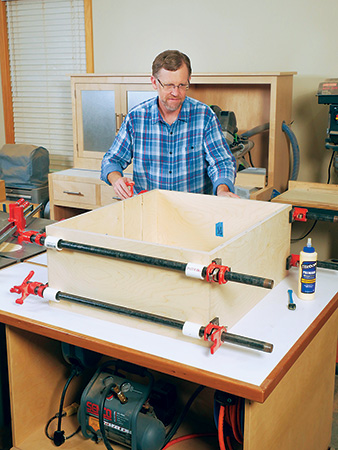
Finish-sand the inside faces of the sides, top and bottom to 180-grit. Then spread glue along the rabbets of the side panels, insert the top and bottom panels into them and carefully clamp up the cabinet carcass. Be careful not to overtighten the clamps. Check the assembly for square by measuring from corner to corner diagonally. The measurements should match, confirming that the assembly is square. I reinforced these rabbet joints with a few 1-1/4″-long, 18-gauge brad nails driven through the carcass sides and into the ends of the top and bottom panels.
Follow the Material List, and measure off of your actual cabinet, to cut accurately sized workpieces for the upper and lower shelves, upper and lower blocking, a pair of narrow cleats and the lower back panel.
Spread glue over one face of each lower blocking piece, and install each to opposite inside back corners of the cabinet at the bottom. Make sure the top ends of the blocking are flush with the bottoms of the dadoes for the upper shelf and do not obstruct them. Reinforce these connections with a few brad nails to hold the blocking in place while the glue dries.
Now finish-sand the front “show” face of the lower back panel and slide it into position in the cabinet, flush against the front edges of the lower blocking. Secure it near its ends by driving 1-1/4″ brad nails through its face and into the front edges of the lower blocking pieces.
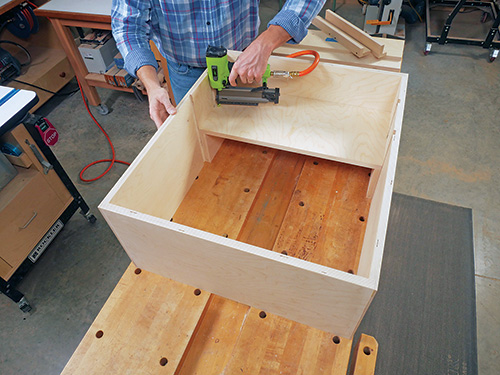
Slide the upper shelf into its dadoes until its front edge is flush with the front edges of the cabinet. If it fits well, remove it so you can sand its faces smooth, then install it with some glue spread into the dadoes. I drove 1-1/4″ brads through the cabinet sides and into the ends of the shelf. I also pinned the shelf to the lower back panel by brad-nailing down through it into the back panel’s top edge.
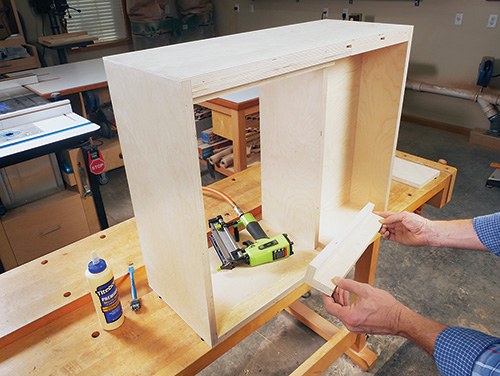
The upper blocking pieces and cleats form two L-shaped assemblies with the face of a cleat butting against one long edge of each blocking piece. Glue and screw these parts together with their ends aligned. Then install them inside the cabinet above the lower blocking with glue and brads. Be sure the cleats face forward toward the upper shelf and the back edges of the blocking are flush with the cabinet back.
Check the fit of the lower shelf in its dadoes, and finish-sand its faces. Glue and nail it into place, driving brads through the lower back panel into its back edge as well as through the cabinet sides and into the shelf ends.
Adding French Cleats and Edging
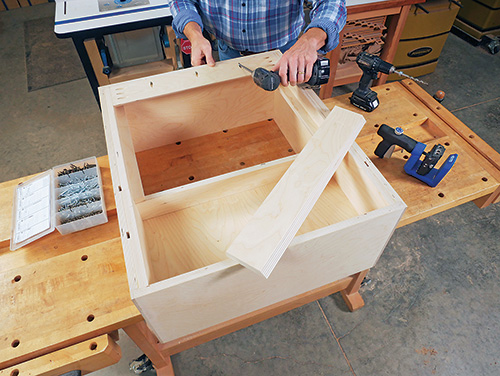
A pair of French cleats will mount this cabinet to the wall. Rip and crosscut 4″ x 22-1/4″ plywood blanks for them, then tilt your table saw blade to 45 degrees so you can bevel-rip one edge of each cleat to shape. When installed, the bevels on these cleats should be oriented toward the cabinet’s interior and down toward the cabinet bottom. I attached my French cleats to the cabinet with pocket-screw joints. Install one cleat flush against the top inside back of the cabinet. I located the top flat edge of the other cleat 9″ up from the cabinet bottom. Its back face should also be flush with the cabinet back.
Solid wood edging will hide the front edges of the cabinet carcass to give it a more finished look. I prepared six strips of long and short edging from solid maple. When gluing each one in place, you can hold the edging securely with several strips of wide painter’s tape pulled over the joints instead of using clamps. Install the long edging strips first, keeping their edges and ends carefully aligned with the cabinet carcass. Then attach four short pieces to the front edges of the carcass top and bottom and to the shelves. Carefully measure and cut these to length so their ends form tight butt joints with the long edging. When the glue dries, sand or plane any overhanging areas of this edging flush with the cabinet edges, then finish-sand the cabinet’s side and bottom exterior.
You could make the top panel of the cabinet either from plywood banded with solid wood or from a piece of solid wood. I chose the latter and glued up a blank of 3/4″-thick maple that measured 12-3/4″ x 27-1/4″. After sanding its top face, edges and ends smooth, I installed it with six #8 x 1-1/4″ screws near the front and back corners of the cabinet’s top interior and in the middle. The back three screws were driven into round pilot holes, as usual. I installed the front three screws into slotted pilot holes instead, with the slots oriented front-to-back on the cabinet’s interior top panel. This way, the maple top can expand and contract forward or backward as needed with changes in humidity, but its rear edge (against the wall) will remain fixed in place.
Making Removable Panels and Doors
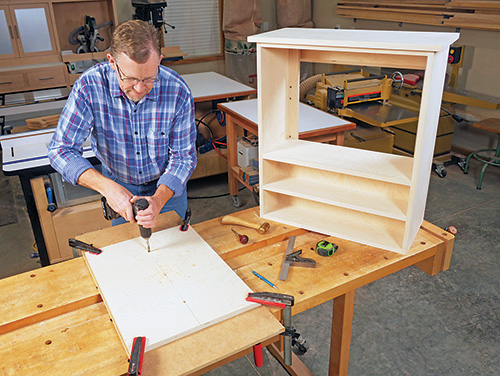
There are still two more plywood upper back panels to make. You’ll want these to be about 1/16″ shorter and narrower than necessary so they’ll slip into place easily above the upper shelf and be just as painless to remove someday, should you ever decide to add or change battery chargers. Cut the panels to size, and sand their “show” faces smooth.
The key to running cords through these upper panels is to drill a series of 3/8″-dia. holes along the panel edges. I bored three along the center seam between the panels using a sharp brad-point bit and clamping the panels edge-to-edge to minimize tearout around the holes. Then I rearranged the panels to drill three more holes along their top and bottom edges, creating six semicircles along the top and bottom of this panel assembly. You can drill as many holes as you like and wherever they are most convenient, based on the number of chargers you plan to use in your cabinet and where their cords will need to be located for easiest installation. Once the holes are drilled, set these panels aside.
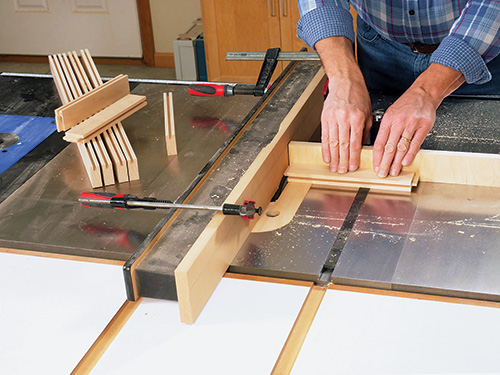
The cabinet doors for this project are about as simple to build as any door can be. Mill stock for the four stiles and four rails to 3/4″ thick, then cut the door parts to final size. I purchased a 24″ x 36″ sheet of clear acrylic for my doors from a local home center. It measured 0.22″ thick. Carefully cut a 3/8″-deep, centered groove along one edge of each rail and stile to fit the acrylic you choose. I did this with a flatop-toothed ripping blade at the table saw in two cuts, flipping the workpieces end-for-end between cuts to ensure that the grooves would be centered on the part thicknesses.
Once the grooves are cut, install a wide dado blade in your table saw again to raise a stub tenon on each end of the rails. Experiment on a test piece when setting the blade height, in order to create tenons that are just thick enough to form a good friction fit in the grooves of the stiles. With that dialed in, mill the tenons on rail ends to 3/8″ long.
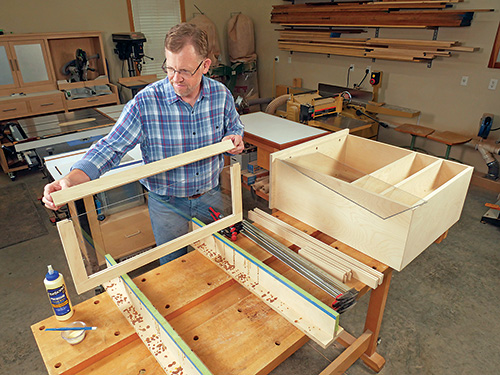
Dry fit the two door frames together so you can measure the width and length of the panel openings from the bottoms of their grooves. Cut an acrylic panel to fit each door at your band saw or with a triple-chip blade in your table saw. Then glue and clamp the door frames together with the acrylic in place. When the joints dry, sand the door faces smooth.
The power strip’s cord will need to pass through the bottom of the cabinet. I bored a 2-1/2″-dia. hole through my cabinet to accommodate Rockler’s plastic grommet, which will give this pass-through hole a tidier appearance for the cord.
Before hanging the doors, now is a good time to go ahead and apply a protective topcoat to the entire project. I brushed on several coats of a satin, water-based polyurethane.
Hanging the Doors and Finishing Up
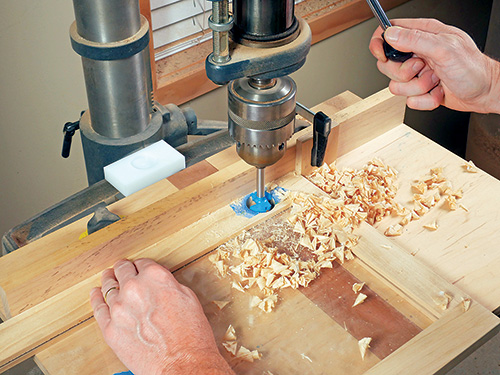
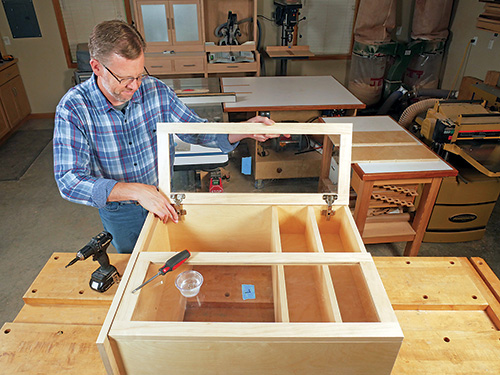
Full overlay 120-degree “Euro” hinges are a simple option for hanging these cabinet doors. I marked locations for the hinges 3″ in from the top and bottom ends of the cabinet, then transferred those layout lines to the backs of the doors. Rockler’s JIG IT plastic Hinge Cup Drilling Jig made it simple to set my drill press fence accurately to bore a pair of 35 mm holes into the back of each door for the hinges’ cups.
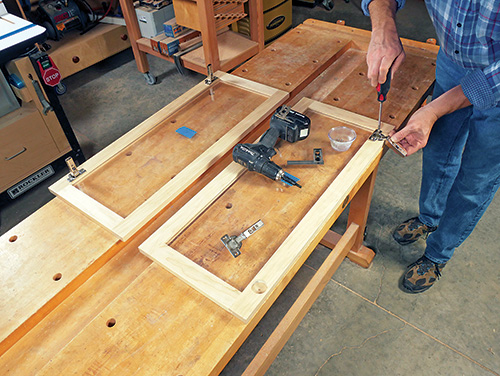
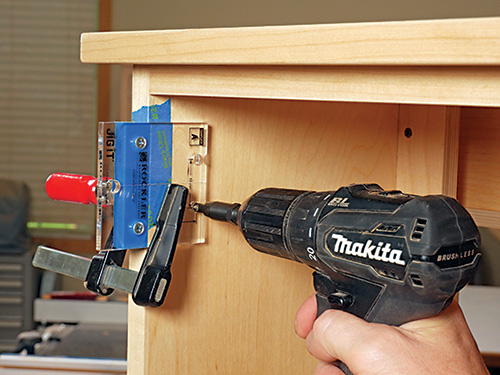
Mount the cupped side of the hinges to the doors with their supplied screws, making sure the hinge arms are perpendicular to the door stiles. A second JIG IT jig enabled me to locate the “cabinet side” holes for the hinge hardware easily in order to drill pilot holes for the hinge screws. Fasten the hinges to the cabinet to hang the doors. Adjust the hinges with their set screws so the doors swing easily and have even reveals between one another and the cabinet top. Once you’re satisfied, install a pair of pulls on the inner door stiles to complete them.
There’s not much left to do on our project! Snap the plastic grommet into place and install a power strip inside the lower concealed compartment behind the lower back panel. Choose the chargers you’ll want to hang on the upper back panels so you can install the necessary screws to mount them on their T-slots. Set the chargers into place in the cabinet, and thread their cords through the back-panel holes. I used 1-1/4″ washerhead pocket screws to fasten the upper back panels to the cabinet cleats. Their large, exposed screwheads hint that these panels can be removed when necessary, down the road.
You’ll need to make up two more French cleats to mount your cabinet to the wall. Then choose a location in your shop where these cleats can be attached to two wall studs and where there’s an outlet close by. Set the upper French cleat — bevel facing the wall and upward — so the cabinet will be a comfortable height for you. Attach it with four 3″ screws driven into the wall studs. Mount the top beveled edge of the second cleat 20″ below the beveled edge of the first cleat.
Set the cabinet into position on the wall, and push it down to engage the interlocking cleats. Then plug in the power strip and load this handy project up with batteries. Now enjoy the fact that your tool batteries will always be charged up and at the ready when you need them!
Hard-to-Find Hardware:
3/4″ Baltic Birch Plywood, 24″W x 30″L (4) #GRP40632_4
Full Overlay Blum 120° Clip Top Snap Close Hinges (2) #55793
JIG IT Hinge Cup Drilling Jig, 5mm Tab (1) #58488
JIG IT Hinge Plate Template A (1) #50375
#6 Self-Centering Bit (1) #68991
Stainless Steel Metropolitan Bar Pull, 5-1/4″ (2) #24418
2-1/2″ Standard Plastic Grommet, Brown (1) #51100


