Well, this week I’ll be pulling out my dado blade and cutting some shelf dadoes for a big case goods project that will run in our June 2010 issue. Of course I’ll want to set it up accurately to cut nice, tight dadoes on my undersized plywood. It’s a job that reminds me of a post I wrote last September. In case you didn’t see it then, I’d like to offer up a couple of tricks to make the set-up process faster and easier. They’ve come in awful handy for me.
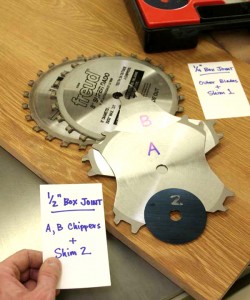
The first dadoing trick is mine: When I find an arrangement of chippers and shims that fits a given dado width really well, I label the parts with a permanent marker and record the combination on cards I keep right in my dado blade case. I use alphabet letters on the chippers and I number the shims. That way, I don’t have to make a bunch of test cuts to find that really sweet 3/4-in. width I want; the “recipe” is right on my card. It’s also really slick for quick box-joint set-ups.
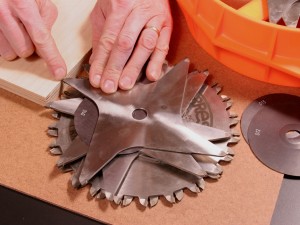
The second whizbang trick comes courtesy of Marc Spagnuolo, a.k.a. the Wood Whisperer. Marc was kind enough to let me share this trick with you here on our blog. Marc stacks his outer blades and chippers together, laying them down next to the workpiece he plans to fit in the dado. He shims the stack as needed until the teeth on top of the stack are flush with the top edge of the workpiece. No need for a measuring device of any kind. A finger swipe across the teeth and workpiece will tell you if you’re on the money:

http://thewoodwhisperer.com/setting-up-a-dado-blade-whisper-mini/
Of course, nobody’s perfect. You may still need to make a test cut now and then to verify the setting. But with these two tricks you’ll make fewer test cuts than you used to and get down to the business of dadoing much faster. What’s not to like about that?
Catch you in the shop,
Chris Marshall, Field Editor


