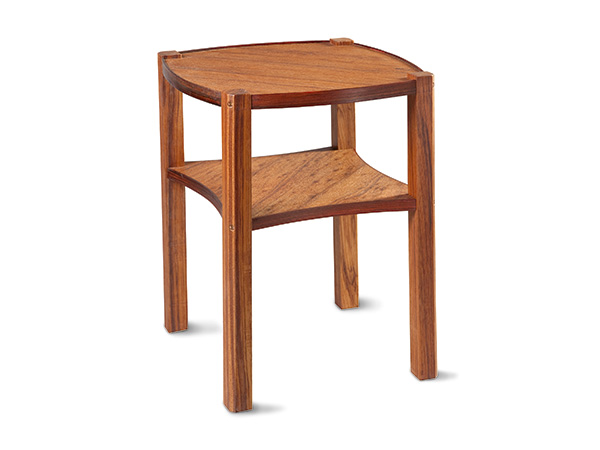
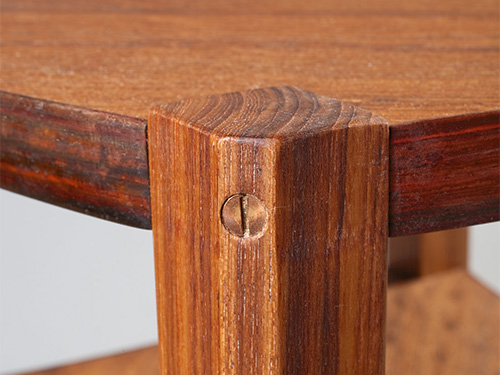
This useful little table can be built for a particular spot where a reading lamp, plant, cup of tea or whatever needs a place to rest. Instead of aprons, stretchers, and so forth, it is put together with eight, 2-1/2″ bronze or stainless flathead wood screws run diagonally through the legs. This makes disassembly and storage easy.
The overall dimensions are readily adapted to different sizes and heights, according to how the table is to be used and where you plan to place it. My first version was for the end of a couch, to support a reading lamp with a shelf below to accommodate magazines. It had not the hint of a curve anywhere in sight — probably an overreaction to having spent the last half-dozen years building boats and dealing with complex, winding surfaces. I liked the table well enough, but soon reverted to old habits and made a second version with curved sides, convex for the top and concave for the shelf below. This is not only more elegant but also gives a little more room on the top surface.
Placing the legs at the outside corners with no overhang makes this table very stable. The overall height depends on how you plan to use it — beside a chair, couch, bed or otherwise. I’d be wary of making the height more than about one and a half times the width. A 16″ x 16″ table, for example, should not be more than 23 to 24 inches high. The placement of the lower shelf depends on what you plan to keep on it — magazines, nighttime reading, or whatever. For stability, the heavier the item, the lower the shelf should be placed, but you’ll find that somewhere within the middle third looks right. This shelf is an essential part of the structure, so don’t be tempted to omit it to save time and material.
To keep such unsupported surfaces flat, you need to select well-seasoned wood in a species not prone to excessive shrinkage or warping. The grain lines run diagonally, from corner to corner, not parallel to a side, so they intersect each of the four edges at an angle closer to 45° than 90°. This minimizes seasonal movement, reducing the risk of glue failure and the edging strips parting company with the top. Note that the grain direction of the top is at right angles to that in the lower shelf, providing a pleasing asymmetry.
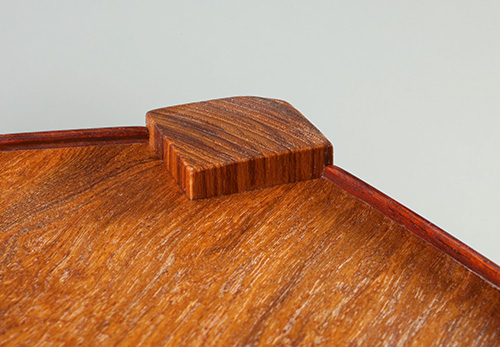
The rosewood edging has two functions: it both covers the end grain and defines the horizontal planes. The edge is raised a fraction above the top surface to act as a stop (sailors call them “fiddles”) to prevent things sliding off. This may seem an unnecessary detail, but for those of us living in earthquake country, it makes sense. I used the profile shown to avoid making a 90° corner where dust and dirt are sure to collect.
Selecting Your Table Species
I used teak for my table, but you could also use any close-grained wood such as cherry, walnut or maple, or a harder variety of softwood such as Douglas fir, preferably vertical grain or close to it. Avoid using wide, flatsawn boards because they are more likely to warp. If that is all you have, cut the boards into 5- or 6-inch widths and glue them up with alternating grain patterns.
Constructing the Top, Shelf
The first step is to make accurate patterns in thin plywood of the top and lower shelf, including the cutouts for each leg. Because the upper and lower shelves are different shapes, you need to make a pattern for each one. Make sure the square cutouts for the four legs match exactly in both patterns — otherwise the table will be hard to assemble and the legs may be skewed out of line.
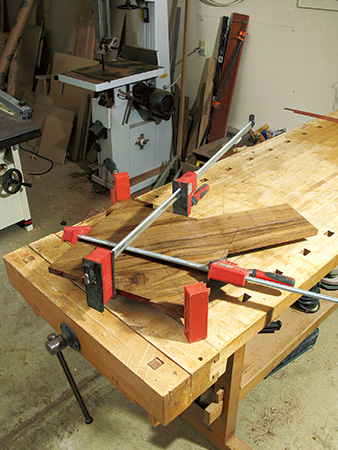
Since I was using 11-inch-wide boards and wanted the grain to run diagonally, I cut four triangular pieces and one rectangular piece and planed them to the finished thickness of 13/16″. I then hand-planed the long edges (I have no jointer in my island workshop) and glued them to a center board to make a square. You can make a plywood jig or clamp them diagonally, so you can apply enough pressure to get a good glue joint.
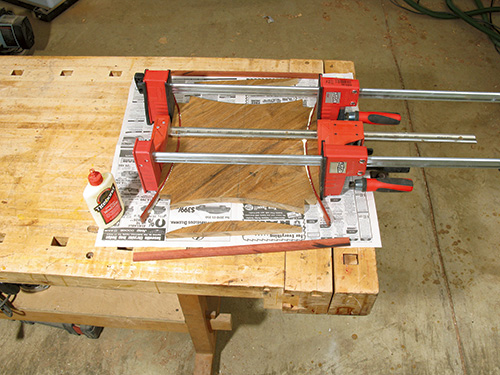
After gluing them up, I finished smoothing the boards with a cabinet scraper and a random-orbit sander.
The next step is to cut the two pieces to exact squares (the top is larger than the shelf because it is convex; the lower, concave). Draw a diagonal line, corner to corner, then pencil in the square and trace the patterns. The square shapes will make the leg cutouts easier to register for sawing, next. Use a knife, rather than a pencil, to accurately scribe the leg cuts.
It is much quicker and more accurate to cut the notches for the legs on a table saw before band sawing the curves. With a sharp crosscut blade installed, set the rip fence and use it as an index so the notches will be identically sized. You will need to change this setup for the shelf. Keep in mind that the structural integrity of this table is dependent on the fit of these eight joints. Ill-bred people have been known to put their feet up on low tables — or even sit on them.
Detailing the Top and Shelf
Cut the curves for the top and shelf (pieces 1 and 2) on a band saw, then smooth the sawn edges so they are ready for gluing. A disc sander is a quick way to clean up the convex curves, but for the concave edges, a spokeshave and contoured sanding block is your best bet. Be sure to keep the offcuts; they will come in handy as clamping pads when gluing on the edging strips.
When using an expensive, exotic wood such as rosewood, ebony, or teak for edge strips (pieces 3), I plane one edge of a wide board smooth, clean it up with sandpaper, then cut the strip free on the table saw using a thin-kerf, carbide-tipped blade. A lightly set featherboard helps to keep the work against the fence. Plane the sawn edge of the original stock again and make another rip cut to produce anotherstrip. Repeat until you have sufficient edging.
Glue the edging strips to the tabletop and shelf blanks and let them run past an inch or so at each end. It’s an easy matter to trim them flush on a disc sander when fitting the legs at a later stage. Before applying glue, have a dry run by clamping up a pair of strips, smooth face out, using the appropriate offcuts as backing blocks Raising the edge around the top surface is a nice detail but adds more work. You may want to make the strips flush with the top surfaces instead.
When the glue has cured, trim the edging roughly to length and glue the second pair of strips on in the same way. Do exactly the same with the lower shelf, letting the strips run by the leg cutouts to be trimmed later.
There is some unavoidable squeeze-out, so if you are using raised edging, pick a glue that’s easily removed.
Making the Legs
Since the legs (pieces 4) have no taper, they can be sawn out on the table saw directly and then planed to their finished size. Saw one corner to 45° as shown on the Drawing and clean it up with a hand plane. If you have a disc sander, this is a good time to finish-sand the top and bottom of each leg.
Drilling for Screws
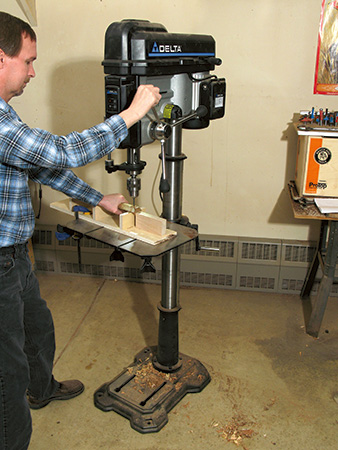
You can attach the legs using 2-1/2″ brass or stainless-steel wood screws (pieces 5) or threaded inserts and bronze machine screws. Running wood screws into end grain can be a bit risky, so the machine screw option could be a very good idea, even though it’s considerably more work. You’ll need inserts with a #10-20 thread, preferably stainless steel, because the brass ones tend to strip and then there is no getting them in or out.
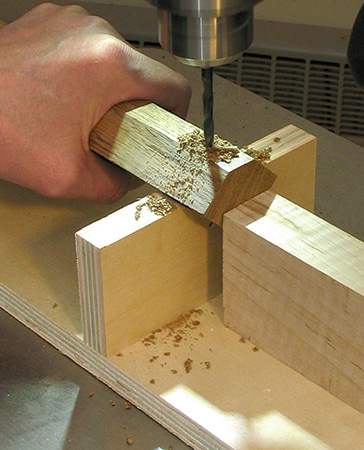
Whichever type of fastening you choose, you’ll need to make yourself the simple cradle jig. Clamp it to the drill press table so the bit is exactly centered on the “V” cutout. Mark the location of the tabletop and shelf screw holes in one leg, then set stops so each leg will be identical. Drill holes for the screws and then, with the leg still cradled, bore a countersink for the screw heads in each of the legs.
Fastening the Legs
First, make a 3/8″ gauge block to ensure uniformity and then lay a leg across the top of the bench. Clamp the tabletop vertically in the vise. Position both parts so the leg projects the thickness of the gauge block and clamp the leg down to the benchtop. Drill a pilot hole into the tabletop for the size of screw you are using. If using a threaded insert, remove the leg and drill a shallow hole of appropriate diameter and screw the insert in place. Replace the leg, install the screw and rotate the top, repeating the procedure with the other legs.
To fasten the shelf, place the table upside down on the bench and cut four strips to support the shelf at the correct height. Wrap a few loops of sturdy string around the legs, insert a short stick and wind the stick end over end to tighten the string until the shelf is securely locked in place. (This ancient device is known as a Spanish windlass.) Drill pilot holes as you did before, and drive the attachment screws. Or, remove the shelf and install the threaded inserts if you’re using them instead of wood screws.
The final step for threaded inserts is to lay the table sideways on the floor, one leg resting horizontally on a piece of carpet, and drive the machine screws home. I use a brace and screwdriver bit for the final tightening because it gives more control. With a bit of luck (and practice) one can usually stop before the screw shears off or the threaded insert pulls out.
Finishing
Before applying finish, I gave the top surface a final hand sanding in the direction of the grain. I used Watco® oil penetrating sealer, which must be wiped off with a cotton rag while wet. A day or two later, I applied a second coat, wiping it off as before. It’s a durable finish, proof against most spills, and it’s easily renewed as necessary. The final step is a thorough waxing and polishing.


