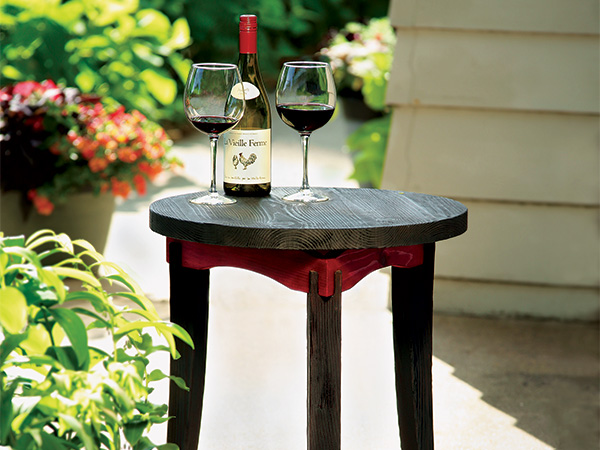
Here’s a practical and contemporary table for your patio or deck that you can build in a weekend — but the really fun part is that you can turn up heat at the end and give it a charred shou sugi ban finish! “Shou sugi ban” roughly translates as “heat cypress plank,” or in this case, “fire cedar table.” It’s a centuries-old Japanese finishing technique that involves creating a 2- to 3-mm-deep char on the surface of the wood to stave off bug infestation, UV degradation and water-induced rot. When used on a softwood like cedar, the flames burn off the softer outer cellulose layer and leave the much harder charred lignin as the external wear layer. Your wood choice and other variables will greatly affect the longevity of projects treated with shou sugi ban, but there are examples in Japan of furniture with charred finishes lasting 50 years or more.
Round Up Your Tools and a Torch
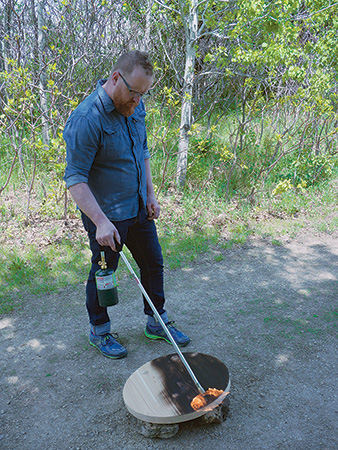
Let’s take inventory of the primary tools you will need for this project before we get started. I used a table saw, trammel points, band saw, sander, router table, a sharp chisel and a drill press. For the shou sugi ban step, I used a small handheld garden torch made by Magna Industries that you can find at most home improvement stores. It runs off of the same small propane tanks used for heaters and camp stoves. There are larger garden torches available that use a 20 lb. propane cylinder, but I found the larger flame to be a bit too intense for the small detailed parts of the leg joints on this project.
Getting Started
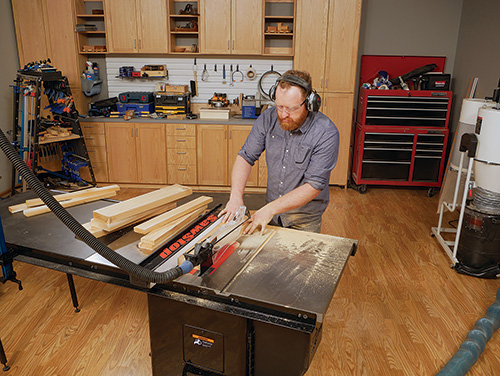
Round up some dimensional cedar lumber for the project. I used a 4×4 for the legs, a piece of 5/4 x 6 decking planed down to 1″ for the aprons and a 2×6 reduced to 1-1/4″ thick for the top.
Cut pieces for the tabletop to rough length, and use a jointer or table saw to flatten their edges. Glue them together to form a panel, making sure to alternate the growth rings from piece to piece to help it stay flat.
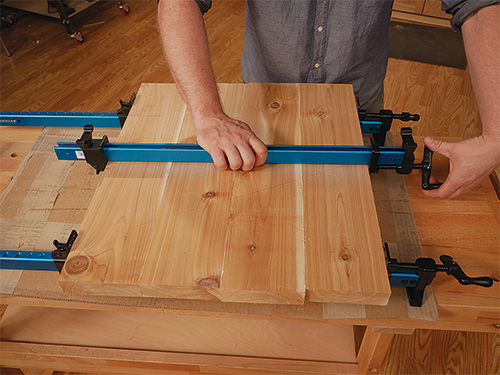
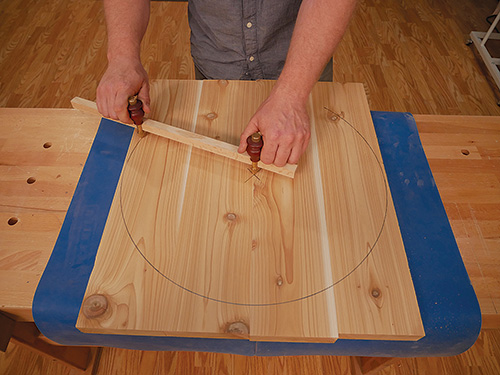
When the glue joints dry, use a straightedge aligned across the diagonal corners to find the panel’s centerpoint. Now set a pair of trammel points with a pencil installed to 10-3/8″, and mark a circle around the panel’s center.
Head to the band saw and carefully cut out the circle, sawing just outside the pencil line. Sand the edges to refine the shape, and decide which side will be the top.
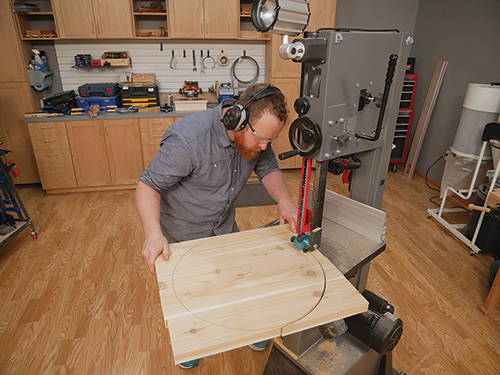
Here’s a lesson I learned in that regard: knots will take quite a bit more heat to darken than the clear grain, so if your panel has more knots on one side than the other, make that the bottom face.
Making the Aprons
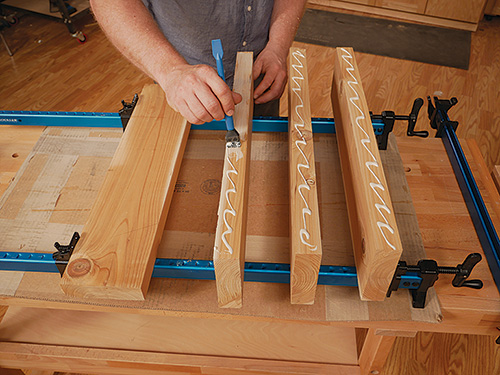
The aprons, a pretty fun project in their own right, take a few steps to make. If you have never mitered 60° to make a triangle, this will be a good trick to learn. Start with three 1″ x 3″ x 18″ blanks.
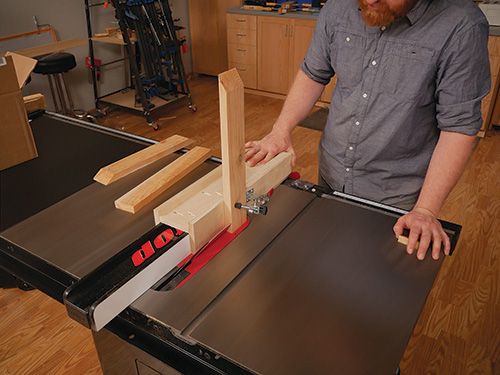
To hold the aprons vertically for cutting the miters, I made a quick jig that rides snugly on my table saw’s rip fence and tilted the saw blade to 30°.
Use a scrap piece clamped to the jig to make a test cut and check your angle setting. Once that’s dialed in, cut both ends off of each apron workpiece to produce a crisp, 60° miter.
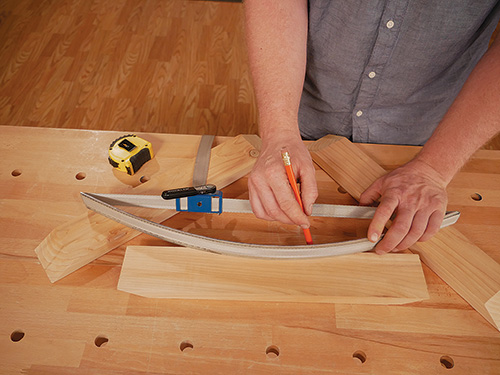
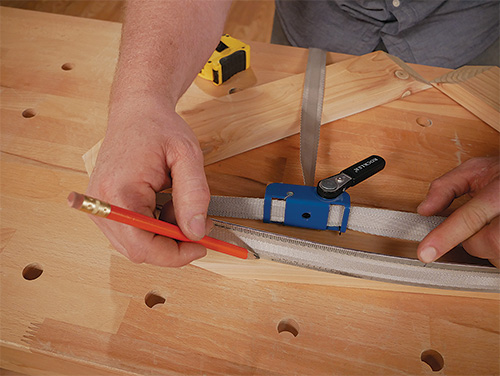
In the Drawings, you’ll see that the top and bottom edges of the aprons are slightly rounded. To set those curves, I used a long metal ruler and a strap clamp to flex it into the correct curve shape, then traced the curves onto the apron workpieces.
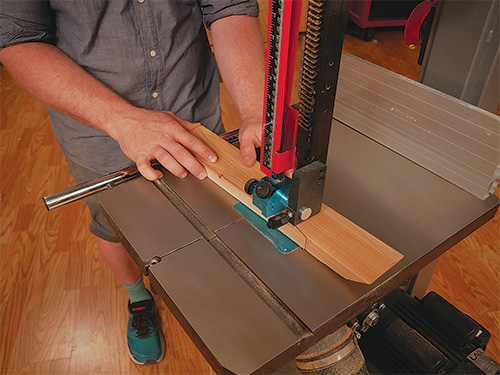
Head back to the band saw to cut them to final shape. Sand these cut edges smooth — it’s easier to do this now than after glue-up. I also clamped the three together for sanding so their shapes would match.
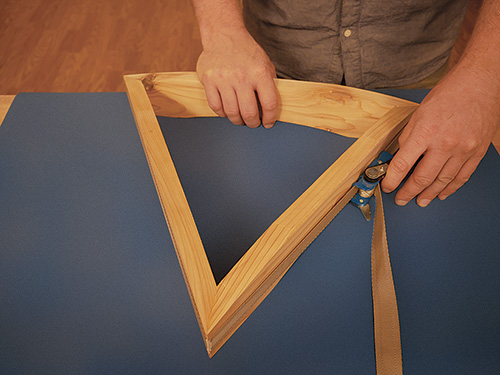
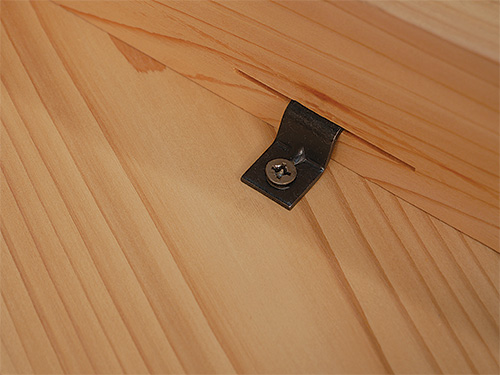
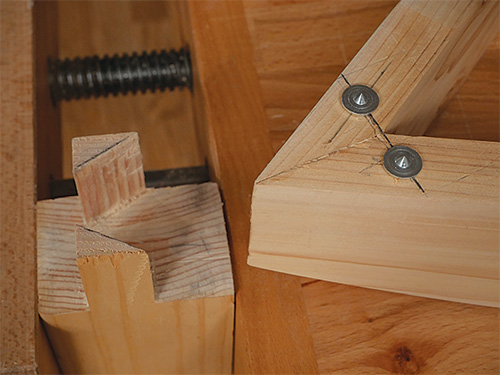
The top of the table will be connected to the aprons with thin metal table top fasteners that fit into slots in the aprons. Since I have a router table and slot cutter, I went ahead and glued and clamped the aprons into a triangle before cutting the fastener slots into the aprons’ inside top faces.
If you don’t have my setup, you can cut shallow saw kerfs into the aprons for the fasteners instead, using a table saw, before gluing the aprons together.
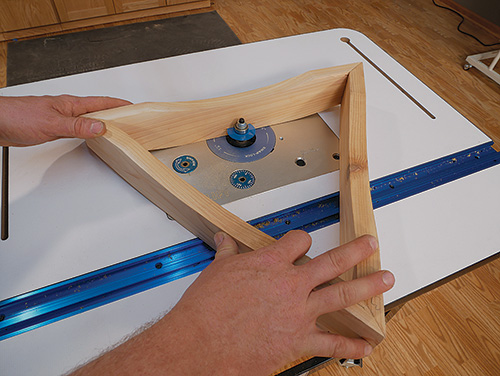
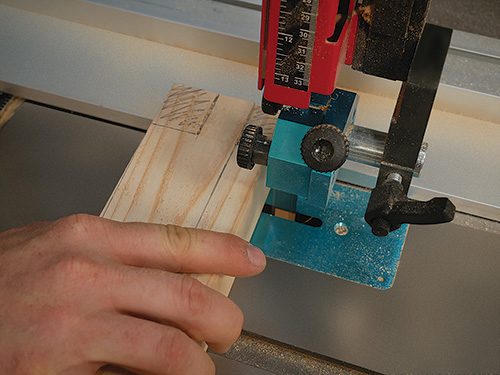
Here are some details for setting up the router table to cut those slots. I installed a three-wing, 3/32″-kerf slot cutter in the table. (Rockler’s 1/4″ shaft #91100 or 1/2″ shaft #91743 bits are both good options here, depending on the router collet size you have.)
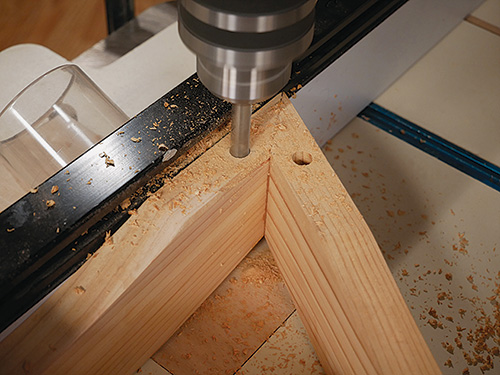
Raise the bit so the bottom face of the cutter is 7/16″ off the table. Check to make sure your cutting height matches the table top fastener shape by placing one on the table surface next to the router bit. The bottom of the bit should be slightly higher than the fastener’s height so that, once installed on your finished project, it pulls the top down and holds it snugly.
Mark a 2″-long slot on the inside face of each apron, parallel to its top edge and centered on the apron’s length. Go ahead and cut each 1/2″-deep slot, sinking the apron into the spinning bit slowly and carefully, then sliding the apron against the bit’s bearing to cut the slots to length.
Sawing and Sawing(!) the Legs
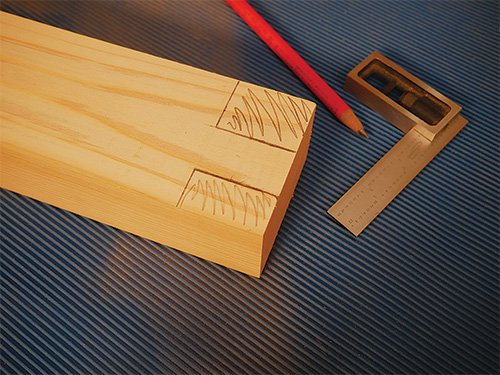
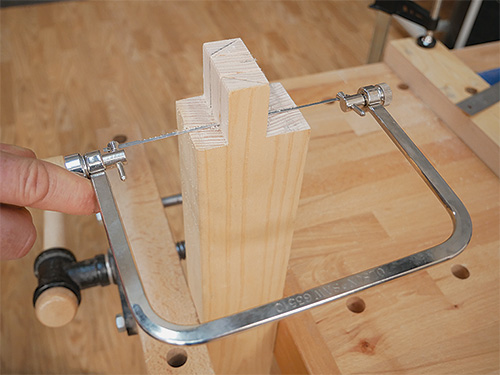
One of the trickier parts of this project is cutting the top joints of the legs to accept the angled ends of the aprons. But, if you study the Drawings and the photos carefully, you’ll see that the joint begins as a 1-1/2″ long tenon, which then gets split into two angled tenons to receive the apron. Then the outside shoulder of these tenons is removed when the legs are cut into their curved, final shape.
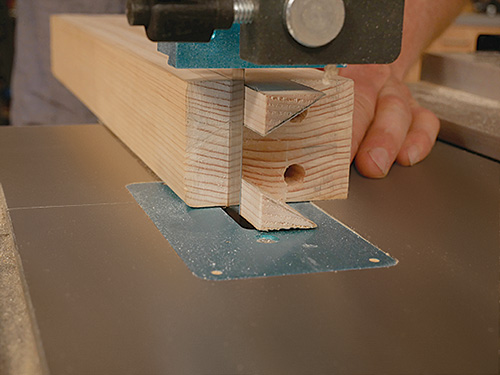
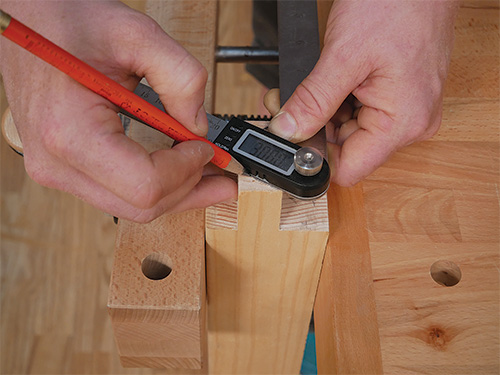
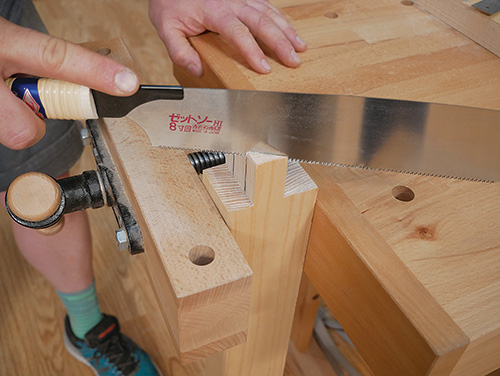
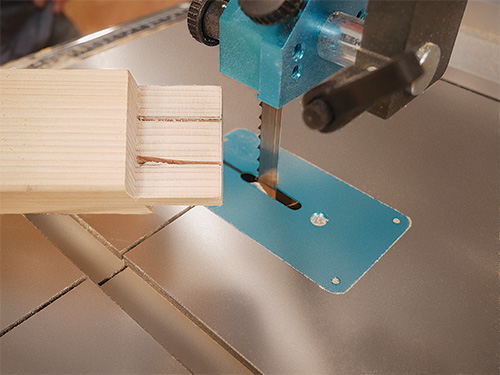
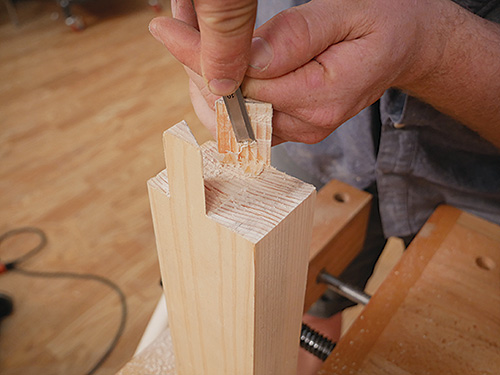
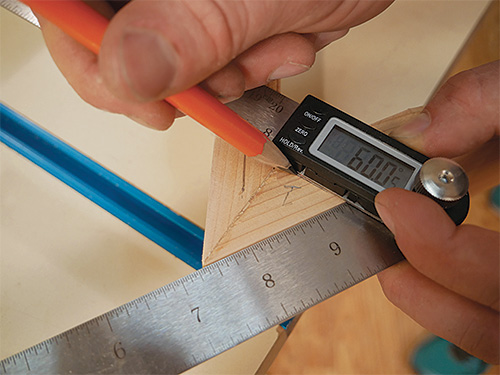
Start by cutting your leg stock into 2-1/8″ x 3″ blanks. Follow the Drawings to lay out the tenons, and cut them at the band saw. I used my saw’s rip fence as a guide to keep the cheek and shoulder cuts flat and square — this is important in order to ensure that the legs will be square to the aprons. With those cut, use a digital angle finder tool or a bevel gauge to lay out a pair of 60° cut lines on the tenons; follow the Drawings carefully to orient these lines correctly. Grab a fine-tooth backsaw or a Dozuki to cut along those lines to split the tenons down to their shoulders. With both angled cuts made, I widened one of the cuts slightly to make room for a coping saw blade so I could saw horizontally to remove the center waste piece. Clean up the angled faces of the tenons and the bottom cutout areas with a sharp chisel; it’s easy to do on soft cedar.
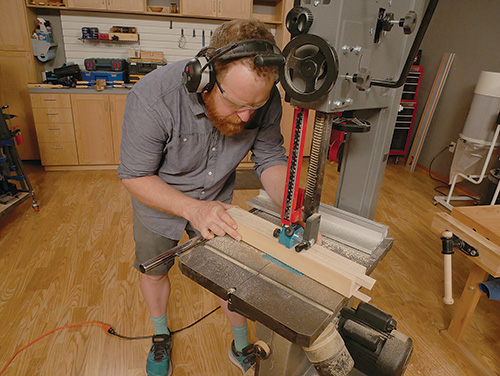
With the tricky tenons now cut, you can lay out the inner and outer leg curves, once again using a flexible curved shape as a tracing guide. Make sure to leave at least an inch of material for the foot of each leg. I laid out one leg, cut it to shape at the band saw and then used it to trace the other two legs to match. Once all three legs are shaped this way, sand them well to remove the saw marks and set them aside for the time being.
Forming Dowel Joints
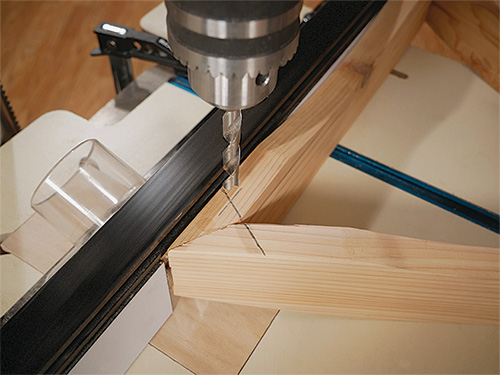
The aprons attach to the legs with pairs of 3/8″-dia. dowels. Lay out locations for these dowels on the bottom corners of the apron assembly by using your angle-finding tool or bevel gauge — again set to 60° — to draw a line across the aprons that aligns with their inside corners. Mark a centerpoint for each apron on these lines. Now set your drill press fence 1/2″ away from the center of a chucked, 3/8″ bit. Drill 2″-deep dowel holes at all six marks.
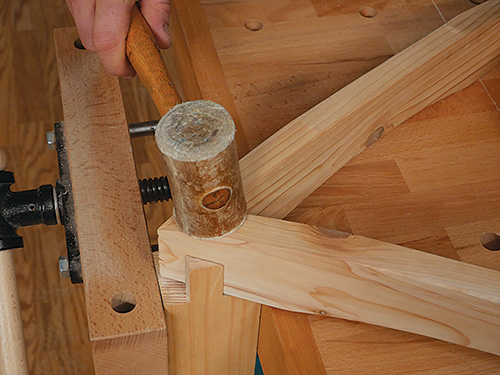
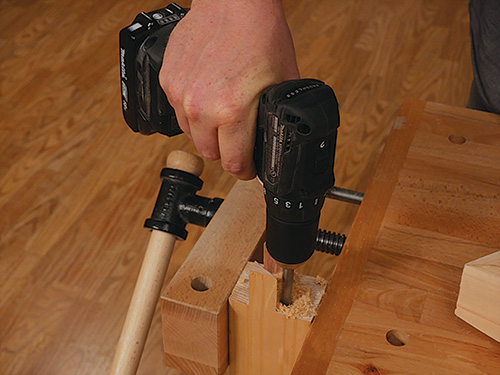
Next, mark the apron corners and legs with “1-2-3” references so you’ll know how the parts go together. Grab a set of 3/8″ metal dowel centers, insert them in the holes of one joint and install the apron on that leg. Tap the apron lightly with a hammer to transfer dowel hole centerpoints onto the leg. Bore them carefully with a handheld drill, making sure the holes are parallel and straight. Move on to make joints 2 and 3 the same way. Once all the holes are drilled, cut six 3-1/2″-long dowels for them.
Now is a good time to do a full dry fit to make sure the project fits together well before you apply finish. Align and attach the apron to the top, using your table top fasteners and 1″ screws. Then install the apron on the legs. I found it easiest to assemble these joints if I put one dowel in the leg and one in the apron for each joint. If you need to make any adjustments to the joint fit, now is the ideal time. Once everything goes together nicely, disassemble the parts.
Staining the Apron
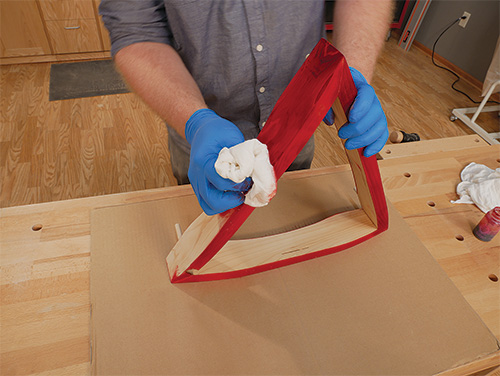
I chose to stain the apron red, which makes a bold contrast with the charred wood that I think looks great! Make sure you wear disposable gloves and old clothes when working with wood dye, because it will permanently stain anything it touches. I wanted a rich, deep red color, so I mixed one part dye to four parts water. Evaluate your dye mixture by wiping it onto some scrap wood. Once you have a color you are pleased with, it’s a very simple wipe on/wipe off stain application with a rag. Try not to splash or drip the dye onto the wood, as those spots may appear darker than the rest of your finish if the dye is allowed to set. Once it’s dyed, set the apron aside to dry, using three of the dowels in their holes as a drying stand.
Preparing for the Burn!
Now comes the part we have all been waiting for! As I talked about initially, shou sugi ban is a method of finishing that helps preserve wood when left outdoors. Bugs don’t like the taste of charred wood, and you will have burned off the softer wood that is less resistant to rot, leaving a hard and relatively impermeable surface.
Before proceeding, make sure you are using your torch in a safe environment. Stay away from grass and other flammables; a driveway or gravel patch will work well. Have a bucket of water on hand in case your table parts accidentally turn into a campfire. I used a few large landscaping rocks to elevate the parts off the ground for burning.
Once I had burned the top and legs and brushed down the surfaces, I wiped a heavy coat of tung oil onto them as a prefinish, let it soak in, then re-burned all the surfaces. This heats up the pores of the wood and sucks the oil in deeper. You’ll start to see a deep, beautiful finish coming through. However, be sure to not get oil inside the leg joints, which could prevent the glue from sticking. Soak and burn one section at a time before flipping the workpieces over and proceeding.
Fire Up the Torch!
Take your time to get the feel of the technique, and be careful not to overcook the surfaces. While a deep alligator scale finish looks very cool, it’s probably too coarse for a tabletop. But, the amount of burn and texturizing is, of course, up to you.
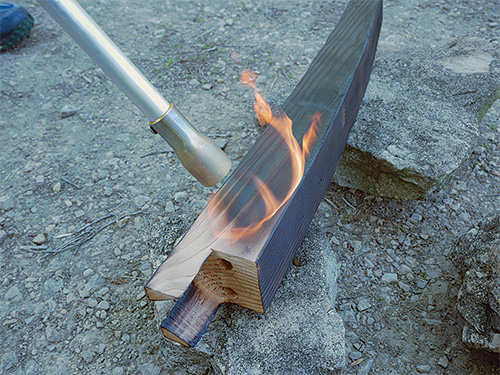
When burning the legs, be careful not to incinerate and damage the small tenons you’ve made or burn the inside of the joints any more than necessary — you’ll want to leave as much untorched wood as possible for the glue-up.
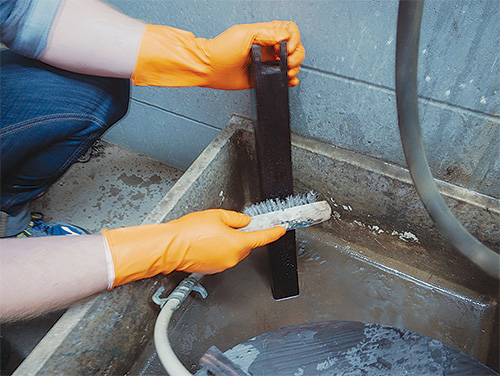
Once the the legs and top are evenly burned, let them cool while you find a stiff wire brush and a garden hose. Lightly scrub down the surfaces to remove excess soot and loose wood. Rinse the parts, and repeat with more scrubbing until the water runs fairly clean off the surfaces. Then leave the legs and tabletop to dry thoroughly for the rest of the day before proceeding with final assembly and finish.
Glue-up and Final Finish
Once the oil is dry to the touch, you can move on to the glue-up. I used Titebond® III waterproof outdoor glue. Glue a dowel into each leg and one into the opposite holes on the apron. Then, with a wet rag handy for squeeze-out, liberally coat the inside surfaces of the joints on the legs and slide everything together. Wipe off the excess glue before it gets rubbery. The pre-oiled surfaces will make this cleanup easy and quick. Now stand your table base on a level surface and lightly tighten a strap clamp around the bottom of the legs to hold them in place. Then set a piece of scrap plywood and some weight on top of the apron to push it all together. Let that dry for three to four hours, and leave the top and base unattached.
For the final coat of finish on the whole project, I applied two coats of General Finishes Outdoor Oil. If you haven’t tried it, it’s a UV-stable linseed oil with mildewcide that’s suitable for all exterior projects. Before applying it, I wiped the base down one last time to remove any remaining sooty oil from the prefinishing step. Then I flooded the oil onto all the part surfaces as well as one face of the tabletop. When that face dried, I proceeded with the edges and the other face, followed by the second coat on the base.
Give the oil a chance to dry thoroughly, and be sure to lay your application rags out flat to dry before throwing them away — linseed oil generates heat as it dries, and that’s a fire you don’t want to have with this project!
At this point, you are only three screws away from being done. Just flip your table over and screw the top on, using the predrilled holes from the dry fit. Now bring your table outside for a well-deserved happy hour on the patio or deck. Here’s to enjoying a bit of dirty work and having a very cool shou sugi ban table to show for your efforts. It’s ready to weather whatever Mother Nature can throw at it for years to come.
Download the Drawings and Materials List.
Hard to Find Hardware
Dowel Centers Set (1) #27179
Table Top Fasteners (1) #34215
Trammel Points Kit (1) #39394


