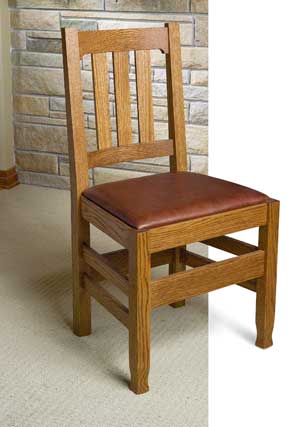
Our last eZine of the old year led woodworkers to reminisce about projects from their pasts.
For instance, a question in our Q&A section about a reader about to embark upon building his first chair led this reader to remember when he was facing the same experience – and to share his advice. – Editor

“The ‘Grand Canyon El Tovar Hotel Chair’ from Woodworker’s Journal, December 2008, was the first chair that I ever attempted. I am not a fan of loose tenons and made the chair using tenons that were cut on an angle on the seat rails and bottom rails. I agree that chair making is probably the most difficult project in woodworking. Unfortunately, instructors and most experts tend to scare woodworkers into thinking that making a chair is beyond their ability. I had received the ‘Make your first chair from 2 x 4…’ I wasn’t very far into the project when I realized that ‘I can do this’ and used oak for the chair.
“Normally, it is not my style to advise anyone to purchase specific woodworking equipment, [but] the tools for a chair with splayed legs can be had for about $300. The first is a tenon jig for the table saw. This jig is used at 90 degrees and can easily be replaced with a shop-made jig, saving about $100. The second is a digital angle box, and the third is a repeatable miter gauge for the table saw. The Rockler blue miter gauge with stops every 2-1/2 degrees is the one that I used; however, any of the newer miter gauges with positive and repeatable angle stops will work.
“The most important part of chair making is to modify the design to fit the tools and techniques of your shop. For example, my ‘El Tovar’ chair has the legs splayed at an angle of 7-1/2 degrees. My miter gauge has stops at 5 degrees, 7-1/2 degrees and 10 degrees . . . off of 90 degrees. I can not cut 7 degrees nor 8 degrees. I changed the design to have 7-1/2 degree splayed front legs. The tenons and tenon shoulders were cut with the table saw blade at an angle of 82-1/2 degrees. Once the blade was set to 82-1/2 degrees, all of the cuts were made. The tenon shoulders were cut first and then, with the two outside dado blades separated with steel spacers, the tenons were cut. After all the cuts were made, the table saw setup was torn down. It is necessary to change the miter gauge between plus 2-1/2 degrees and minus 2-1/2 degrees from 90 degrees during the tenon shoulder cutting process. This technique permits the mortises to be cut square to the face of the legs. The mortises can be cut by a variety of methods, including the router table.” – Rich Flynn< And, as readers shared suggestions for what Rob could build for his first grandchild (a baby due in the new year), another reader remembered what he had built for his own children and grandchildren. – Editor
“I built a Jenny Lind cradle in 1994 from plans I found in Woodworker’s Journal, and it has been through four grandchildren to date. Built out of walnut, it is still a beauty and a source of pride to this day. Long before that, though, I built a toy stove, refrigerator, and sink set for my daughters, along with doll cradles, too. A small trestle table with benches served many “tea parties” well. I’m sure there were other things, but all of my children are grown now and took many of those mementos with them for their own children to play with.” – Ray Nations


